3ds Max

Creating an ocean in 3ds Max using Wave Generator

Test scene2

waveGeneratorTool_01Wave Generator is a Plugin written by Ruben Mayor and Philippe Jadoul for 3ds Max. Very quickly you can generate ocean surfaces including control over waves. The plugin is currently in alpha version. We needed a solution to create various oceans surfaces. Wave Generator gave me the ability to create the ocean as a 3d object then add materials or even export it to other applications.  I found it very straight forward to work with and in 3ds Max I just add a daylight system and a generic mental ray water material to create the image above.

You can download Wave Generator here.

NOX Free Render Engine

nox-renderer
"Nox Renderer is a rendering software based on unbiased methods. Development is currently in beta stage." Evermotion.org
NOX Renderer is available for download here.

This is how I got on with NOX renderer in 3ds Max, this is not so much a review but my first impressions. Once the Renderer is downloaded and you have also installed the Material Library open up 3ds Max and choose NOX as the render engine.The next step was to set up the scene, I used the Fendi Dorchester Chair which you can download here. The Sunlight System is in the Standard Lights Menu in 3ds Max and Camera is in the Camera Menu.
Materials
Next up was applying the materials. Open up the Material Editor in 3ds Max and click on Standard and choose Nox Material. The material Libery that comes with Nox is very nice. I then applyed the fabric to the chair and wood to the legs and floor.Blury

After hitting Render this is what I was getting, in fact it was a lot more over exposed. Also I turned off Real-World Scale in the UV Maps on the Chair. The problem was with the exposure, aperture and camera distance. Once I had adjusted these three I got the render below which took 21 minutes.I found Nox Renderer nice and simple to use and I am looking forward to working with it more in future and seeing it develop. 21min_final NOTE. After writing this post Evermotion have posted some tutorials here. Check them out, there are some great features and you will probably get on better than I did.

Autodesk University

Just wanted to post about Autodesk University. This is a great site with content on most of the Autodesk products. Alot of 3ds Max which is great for me. With presentations in all fields of 3D and CGI I highly recommend checking it out. You can log in with an Autodesk or Facebook account. I particularly enjoyed Ramy Hanna's Is That a Photograph? Architectural Photography for 3D Rendering.

AU

New Multi Control App, 3D Connextion, Wacom and the Ipad

Maide Inc have come up with this great way of using the ipad and iphone with 3ds Max and Maya.http://www.youtube.com/watch?feature=player_embedded&v=BI_pnzES7F0 http://www.youtube.com/watch?feature=player_embedded&v=V7V-UkDQUQo

wacom-intuos3-6-x-8-inch-pen-tablet

I saw this metioned on Evermotion in their monthly newsletter and gave it a go at work. Not being an Ipad or Iphone user the intuitive functionality did not come as easy as if I had experience with the 2 devices. The Maide Control needed a bit of a learning curve but does have a lot of potential. I got very excited and thought about purchasing an Ipad instead of the Space Pilot Pro I have been dreaming of for a while now. I am currently using the Space Navigator and a Wacom Intuos 3

I started looking into Ipad/Wacom alternatives, there was not as many as I thought there would be. I found a few things of interest then I stumbled upon this actually made by Wacom. http://www.youtube.com/watch?feature=player_embedded&v=tbuZ_ulQfLA So being very comfortable and happy with both my Space Navigater and Wacom, but being due an upgrade at some point this year is it worth combining the 2 and having only one device on the desk, plus having all the other functions the ipad has? Is it worth the learning curve? Or should I look at this as great potential and go for what I know and love. I have been looking for an excuse to get an Ipad for a while now and as I am looking for a mobile phone contract to use in Monaco, maybe an Ipad could be the way to go instead of an Iphone.

HDRI Reflections

3.jpeg

1-2This post is to describe how I got the reflections on the Vespa in a studio environment. I think you can just add a HDRI to the environment slot in the material editor. But I did it like this.

I created a sphere around the Vespa and applied the HDRI checking it was 2 sided and in the Self-Illumination slot. The Vespa is on a plane with an omni light with a multiplier of 0.01. When it came to rendering I added a Object ID pass and a separate object id to the bike, plane and sphere in the objects properties. The pass and render are below

3Using the pass in Photoshop I masked out the background and added a gradient. I hope this all makes sense please feel free to add any comments and ask questions below.

4

Cambridge, UK Modular Buildings Project.

4ed8ae384173d45937a790a260a0cdf2-3508-2480_size_640.jpg

Wip2 This week I shot some textures in Cambridge for a modular building project I am working on. The benefit of modular building is the ability to use parts of the building like lego blocks to create variations using the same materials and without lots of modelling work. See below for example the blocks on the left can be used to create many variations of the building on the right. The Cambridge photo shoot Texture Pack is available in the Downloads section on this site along with the 3d Models, Photoshop .PSD files and a Prezi tutorial of how to create your own buildings quickly.

Cambridge_Mod_B

Ambient Occlusion How To: 3ds Max, Mental Ray and Photoshop

As mentioned in Basic Compositing in Post Production I will go through how I create an ambient occlusion material and use it in Photoshop. Ambient occlusion can be used to enhance shadows in renders. I have set up a model of a Vespa that I previously made and added some lights to the scene. This is how the render currently looks.

VespanonAO

In a new material slot in the material editor (M on the keyboard) the first thing I do is change the Ambient and Diffuse colours to black and tick on Self-Ilumination.

Ao1
Add a Mental Ray Ambient/Reflective Occlusion material to the Self-Illumination slot and change the samples to 64.
Ao2


Ao5
Open up the Render Settings and in the Processing Tab tick Enable under Material Override, then drag the Ambient/Reflective Occlusion material into the Material.
Ao4
If when you render it is all black make sure Exposure Control is off in the Environment Settings (8 on the keyboard).
Ao3


Then up the max distance in the Ambient/Reflective Occlusion Parameters until you get your desired result. Here is mine.

VespaAO

AO6Save the render and open the original and Ambient Occlusion Render in Photoshop and whilst holding Shift drag the Ambient Occlusion onto the original render and change the layer style to Multiply. You can also change the opacity if need. Here is the final result.

VespaAOF

Basic Compositing in Post Production

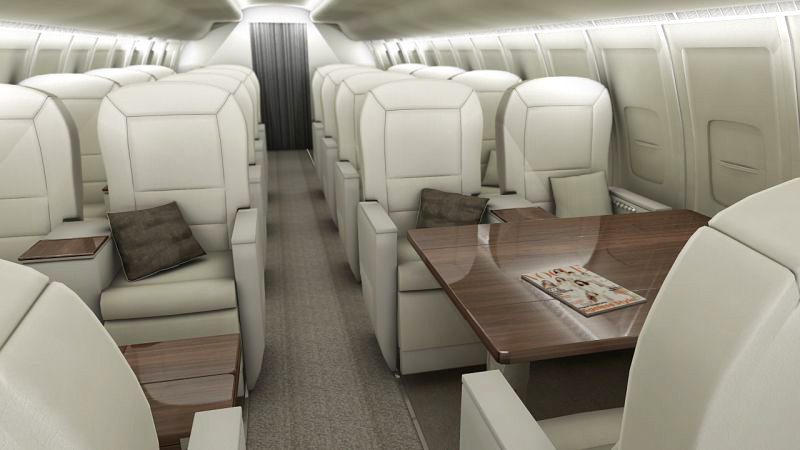
I recently completed a couple of new interior renders for an Avro RJ using 3ds Max and Mental Ray. So I thought this would be a good time to explain the basic Photoshop Postwork I go through.

1evp88

Compositing in post production is one of the most important and probably most over looked parts of CG. It was only recently I started compositing different renders to improve the quality of my final images, so I am in no way an expert but this is how I composite my images.

The most important thing is lighting, something that I am yet to master but here are some great links to get you on your way. 8 Tutorials To Make You Fully Understand 3D Lighting In CG. But this will only get you as far as the render output on the image above.

Adjusting the Levels (Image > Adjustments > Levels) in Photoshop will make sure you are getting the most colour range out of your image. Render3ao

Rendering out an Ambient Occlusion Pass from your 3d application is one of the best ways to improve results. The render will look something like the one here. Put it on top of your image in Photoshop and Multiply or Overlay it in the layers, you can also adjust the opacity. I then duplicate and merge the layers and adjust the Levels and the Brightness and Contrast.

When rendering out of 3ds Max I have found the images could do with crisping up. To do this add a Unsharp Mask. (Filters > Sharpen > Unsharp Mask)


Render3zd

To get a Lens Blur or Depth of Field you will need to render out a Zdepth pass. The output should look something like this one. You can override all materials instead of replacing them in 3ds Max (Render Setup > Processing > Material Override > Check the Box and drag the material in.) The last thing I do is adjust the contrast and save the image out. There is so much more you can do but here are the basics of what I generally do.
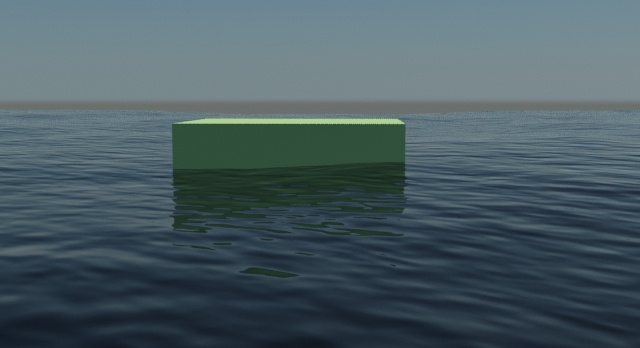
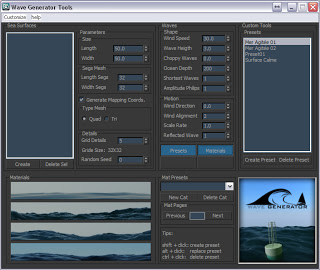
 

How to Model, Texture, Light and Render a Macbook in 3ds Max

MacPro.jpg

I have a series of lectures coming up and one of them will be Modelling a Macbook in 3ds Max, here is the first attempt. This video is at about 10x speed and shows how to set up blueprints and model the Macbook using simple primitives and pro boolean. I am not the biggest fan of boolean but in this case they proved very effective. http://www.youtube.com/watch?v=3fbc_jj8MXg In the second video of the series I go through Texturing, Lighting and Rendering a Macbook in 3ds Max. This time it is a brief introduction to materials and texturing. Again the video is at about 10x the speed and shows a simple Mental Ray setup for rendering, materials and adding an animated texture to the object.

http://www.youtube.com/watch?v=stxr7l-yZxM

You can also buy my model from turbosquid.