How To

A 10 step guide on how to add a pop up notes in 3ds Max with pictures

Script.jpg

A 10 step guide on how to add a pop up notes in 3ds Max with pictures. This guide will take you through every step in this simple process.

Add Pop Up Notes in 3ds Max

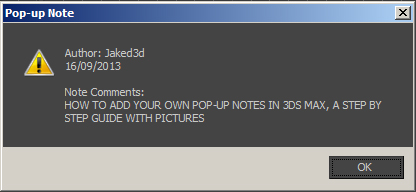
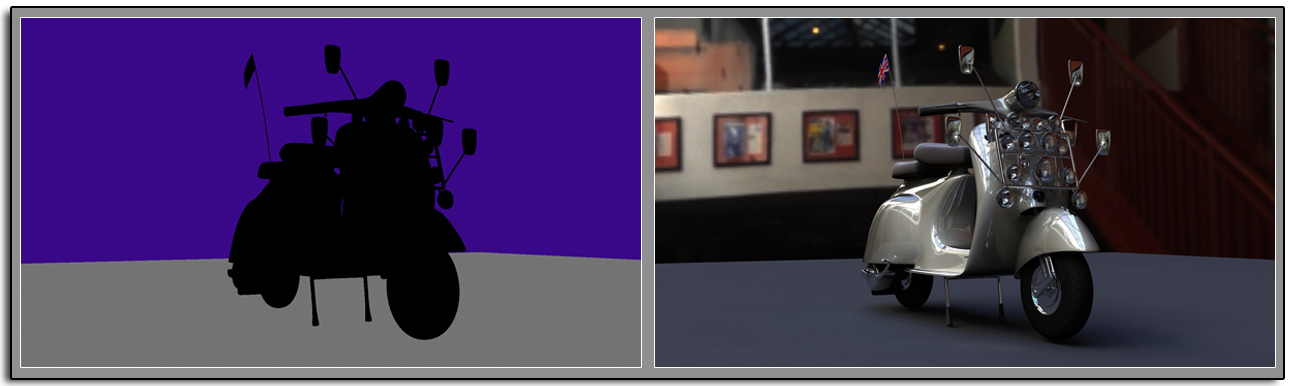
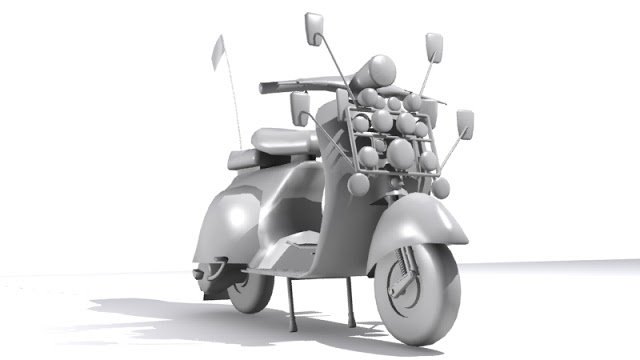
If you have downloaded one of the 3ds Max scenes from the downloads page you would have noticed a pop up note when you open it in 3ds Max. These can be useful for adding notes about the file for future reference or for a college who is going to use the scene or 3D model. To add pop up notes in 3ds Max  is very simple just follow the steps below.

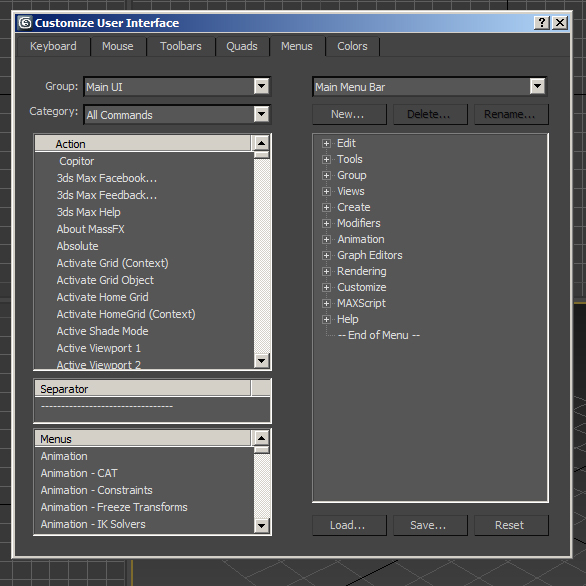
1. Right Click on the Main Toolbar in 3ds Max and select Customize from the drop down list.

Add Pop Up Notes in 3ds Max Step 1

2. Click on the Menu tab at the top of the new window.

Add Pop Up Notes in 3ds Max Step 2

3. Now you can choose where you want to add the button to Add a Pop Up Note. I recommend Tools. So click the + next to the word Tools.
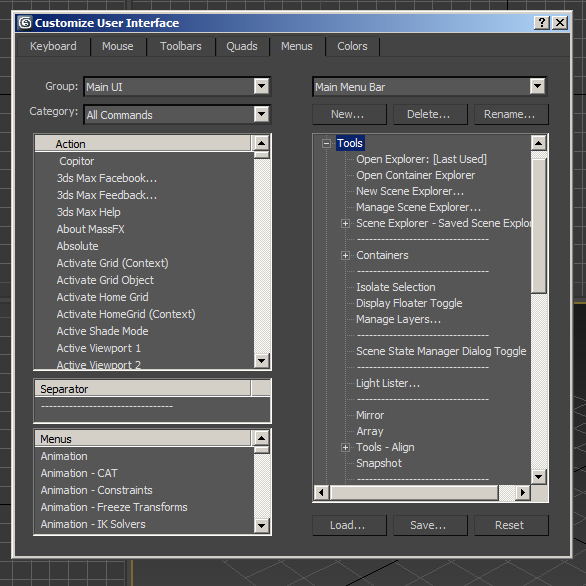
Add Pop Up Notes in 3ds Max Step 3

4. Now drag and dropSeparator bar across from the left side to the bottom of the new list.

Add Pop Up Notes in 3ds Max Step 4

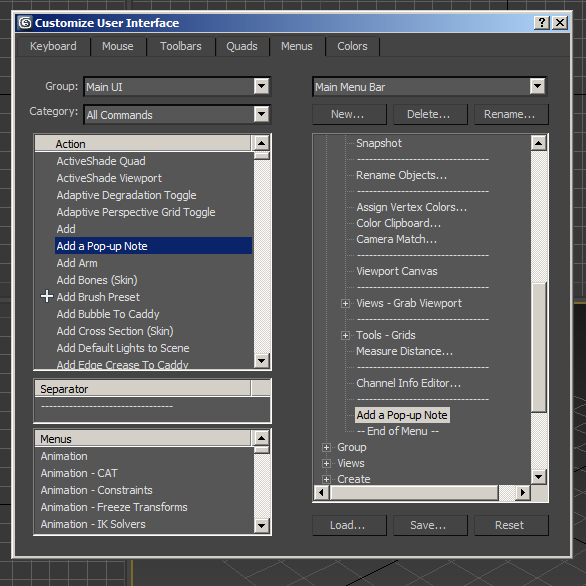
5. In the Action list in the top left of the Customize User Interface window Drag and Drop Add a Pop up Note underneath the new Separator you just added.

Add Pop Up Notes in 3ds Max Step 5

6. Close the Customize window.

Add Pop Up Notes in 3ds Max Step 6

7. Now when you click on Tools in you should see Add a Pop up Note at the bottom of the list.

Add Pop Up Notes in 3ds Max Step 7

8. Click Add a Pop up Note.

Add Pop Up Notes in 3ds Max Step 8

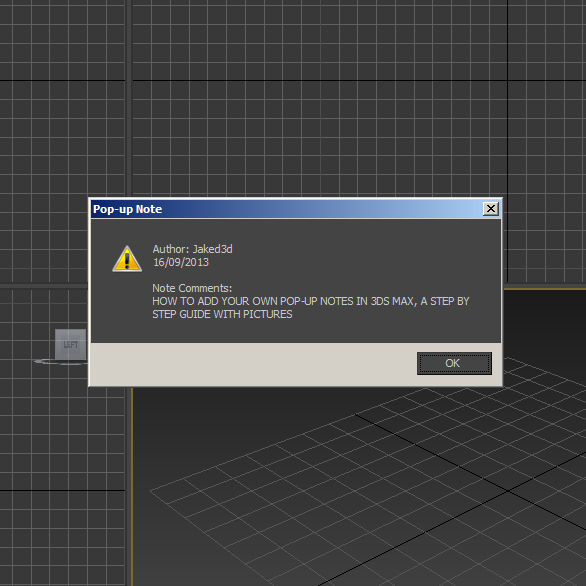
9. In the Pop Up Note window make sure that Show Note on File Open is checked. Here is also where you can add the Authors Name, Date and Description. Click Add Note.

Add Pop Up Notes in 3ds Max Step 9

10. Now save. Now when you open the file the Pop Up Note will appear.

Add Pop Up Notes in 3ds Max Step 10

And there you have it you can now add pop ups note in 3ds Max. If you found this post useful or informative please help me by commenting and sharing. Thank you.

Related Content:

Hyperlapse Tutorial - How To

hyperlapse1.jpg

What is a Hyperlapse? A good Hyperlapse Tutorial and applying it to 3D.

Hyperlapse photography is very similar to timelapse photography. To create both timelapse and hyperlapse photography you take still shots at regular intervals. Where it differs is time-lapse shows the passing of time from a fixed point. Where as with a Hyperlapse the camera is moving. These images are then combined in a movie editing software to create a video.

Here is a video tutorial on how to create hyperlapse photography.  Griffin from the Indy Mogul, a  DIY movie making channel, talks to film makers  Chris and Oliver. They explain the techniques they use to capture shots with just a tripod and camera. This particular hyperlapse technique requires a lot of trial and error, but the outcome can be stunning.

For 3D Artists timelapse video is much easy to capture. In many 3D applications you can select a camera, click key frame and move your camera. Render out your frames. Then using a zdepth pass you can change the focus on your shots in adobe after effects or similar program.

Z Depth Pass for Hyperlapse Photography and Rendering

The hyperlapse video is used regularly in 3D architectural visualisation. One of the best architectural visualisations to date is Alex Roman's The Third and The Seventh. Watch the full length video below in full screen. The Third and The Seventh Book will be arriving soon so keep an eye on  http://www.thirdseventh-book.com/

The Third & The Seventh from Alex Roman on Vimeo.

Hyperlapses take a lot of time for a small amount of output. It has been compared to stop-motion meeting time-lapse photography. The results can be incredible for those who have the time and patience. Any other good hyperlapse or timelapse photography examples or tutorials drop them in the comments below.

Photoshop Brush Smoothness

I always had a problem when painting with a hard brush in Photoshop. I found that the default would leave spaces. I never looked into fixing this until today, I used to go over the same area a few times. Not very productive I know.

Brush-hardness

In Photoshop open the Brush Tab by selecting Window - Brush or pressing F5. In there with the Hard Brush selected change the spacing to 1% rather than 25%. And there you are, a nice smooth brush.

To save the new brush hit New Brush Preset and OK.

brush

Then hit Brush Preset (top left of the pop-out) Preset Manage and move the new brush to where you want.

Then you can save the new set. brush1

How To Record Actions in 3ds Max like in Photoshop

I was looking for a way to repeat some of the most common tasks I perform in 3ds max. It turns out that using MAXScript is the way to do it. Don't let the word 'script' scare you, it is pretty easy. The task I wanted to create an 'action' button for was. -Apply UVW Map -with Box Mapping and Real-World Scale

To create the Script we need an object to record the action from. So just create a box.

Click on MAXScript (next to Help) on the top menu. Select MAX Script Listener

This Box will pop up, Click MacroRecorder and Enable from the dropdown. 1 Now what ever you do will be recorded, like in Photoshop actions.

Apply a UVW Map > Mapping to Box > tick Real-World Map Size Turn off the MacroRecorder by hitting enable again.

This is what you have. modPanel.addModToSelection (Uvwmap ()) ui:on $.modifiers[#UVW_Map].maptype = 4 $.modifiers[#UVW_Map].realWorldMapSize = on $.modifiers[#UVW_Map].utile = 1 $.modifiers[#UVW_Map].vtile = 1 $.modifiers[#UVW_Map].length = 1 $.modifiers[#UVW_Map].width = 1 $.modifiers[#UVW_Map].height = 1 Select all the text and copy it.

At the top of Max go to MAXScript again and New Script. Paste in the code.

At the top copy and paste this... macroScript UVWmap category:"Jaked3d" buttonText:"UVWmapRWS"

You can change the name of the Script (UVWmap) category:"(Jaked3d)" and buttonText:"(UVWmapRWS)"

Add brackets to the top and bottom of the code like below

Max Script

Now in MAXScript > File > Save where you like In MAXScript > Tools > Evaluate All

Now in the top menu in 3ds Max Select Customize > Customize User Interface In the Toolbars tab in Category you should find what you called your category you can now drag it 'Uvwmap' onto the Main Toolbar.

3

You can now select any object in your scene and apply your script. You can download this one here. Jaked3d UVWmapRWS

You can then combine your 'actions' with other scripts. For example I recorded the same action in the above example with the Centre and Reset script from Frodos Magic Bag to centre the pivot of an object > reset xform > apply uvw map with box mapping and real world scale, in one hit of a button.

Search Macro Scripts in 3ds Max Help for lots more info.

Polygons to Solids for 3D Printing

3ds Max to Solid
The reason for this blog article is to save you from the terrible time I had exporting a polygon mesh into a solid. Basically taking a mesh file and turning into a .iges or similar for 3d printing. After searching the forums and testing out tools that claim to do the job with no luck I had to get busy...

It is possible to take a mesh into Rhino and use the MeshToNumb command, but the mesh needs to be under 20,000 poly and once it is converted it is not smooth and for 3d printing you probably want it smooth. In 3ds Max there is a way to turn your model to Nurbs and export as an .iges. For small models this may work but not for me. If you right click on the model and Convert to Patch and once that is done right click again and Convert to Nurbs. I have not successfully used this method because I have never had the time to wait for the conversion so be warned it does take sometime.
So in 3ds Max there is an export to .iges file in the export box. File>export but unless your model is in Nurbs rather than ploys then this option won't work. So here is how I managed to get quite a heavy max scene into a solid format. This is in no way the correct method but if there is one I would love to know about it.
So here we go with my method. In 3ds Max select your mesh and go to File>Export as .obj. Then open this great tool called 3d Exploration which can be downloaded here. Navigate to the .obj file in here and save it out as a .stl file.
Open up Rhino and import the .stl file. Select the mesh and type in the command bar MeshToNurb. Once this is done select the mesh and delete it, then you should be left with the nurb object. Now all you have to do is export it as an it as an .iges :)

Autodesk 123D Catch Beta

123D Splash
I was very excited to hear about Autodesk's 123D Catch. 123D Catch lets you take ordinary photos and turn them into 3D models. Here is a quick introduction.

http://www.youtube.com/watch?feature=player_embedded&v=6aU2s85Zw3A

recieved

So I downloaded the software from here. The software comes with some good tutorials and the program is pretty straight forward to use. For the object I wanted to create I took 42 photos spinning around the object. I uploaded them and waited for Autodesk to email to let me know it was completed. A couple of the images were too dark so the object I received was not 100% but 42 images is probably the minimum I would suggest.

It looked pretty good if I do say so myself. Next, what I was most excited about was getting it into 3ds Max. This was simple, File, Export, FBX and import into Max, this is what I got below.


import

The scene contains cameras where all the shots were taken from, which could come in handy. I then opened up the Material Editor and selected the material from the object. There were two in this case. The file Autodesk emailed me contained to texture sheets which I remapped to the correct location and below are the 2 texture sheets and the result i got.


textures
I then added a Mental Ray Daylight system and applied a smoothing group to the whole object and rendered. Below are the results. The mesh was very heavy and if I had more time I could have cleaned it up a lot and patched up any broken areas in the model.
render wire
Catch 123D is an amazingly powerful tool which I am sure will come in handy in future. Definitely give this free software a try and let me know how you get on.

Photoshop and Wacom Tablet tips

I have been doing a lot of post production work in Adobe Photoshop with my Wacom tablet recently. A couple of things I came across that I thought might be useful to share.  

image_2c92df24-3465-4d9d-b1b9-6139332f25cd1. Ring when tapping in Photoshop with a tablet. This can become very annoying. I believe it comes as default in Windows 7. This is how I got rid of the problem in Windows 7 x64 bit.

-In the Control Panel search for Edit group policy.photoshop pen ring tablet press windows -In here you need to go to administrative templates, windows components, tablet pc, cursors, turn off pen feedback. -In this window change from not configured to enabled.  -Click OK and your done. Update: There is a lot more information on this subject here.

Layer Masks2. Add a Layer mask shortcut. I am constantly using layer masks and do get feed up of going all the way to the bottom of the Layers pallete to click the button. In Photoshop there is no default shortcut. To add a shortcut click Edit, Keyboard Shortcuts, under Layer Mask> add a shortcut key (I used Ctrl+Q) to Reveal All.

Fix Your Photo’s Exposure Problems in Seconds With This Simple Trick from Lifehacker

Life-Hacker.jpg
A great tip here from the guys at lifehacker to fix exposure problems really quickly.

http://www.youtube.com/watch?feature=player_embedded&v=UyIHpRjaBic

    • Open up the photo and duplicate the layer containing it.
    • Invert the duplicated layer. (The shortcut is Control/Command+I in Photoshop and is likely the same in other image editors.)
    • Set the duplicated layer's blending mode to Overlay.

  • Optional: Reduce the opacity of the duplicated layer if the effects are too much.
  • Optional: Merge the two layers and adjust the levels or curves to suit your taste. (If you're in Photoshop, you can just make a new adjustment layer to do this.)


HDRI Reflections

3.jpeg

1-2This post is to describe how I got the reflections on the Vespa in a studio environment. I think you can just add a HDRI to the environment slot in the material editor. But I did it like this.

I created a sphere around the Vespa and applied the HDRI checking it was 2 sided and in the Self-Illumination slot. The Vespa is on a plane with an omni light with a multiplier of 0.01. When it came to rendering I added a Object ID pass and a separate object id to the bike, plane and sphere in the objects properties. The pass and render are below

3Using the pass in Photoshop I masked out the background and added a gradient. I hope this all makes sense please feel free to add any comments and ask questions below.

4

Cambridge, UK Modular Buildings Project.

4ed8ae384173d45937a790a260a0cdf2-3508-2480_size_640.jpg

Wip2 This week I shot some textures in Cambridge for a modular building project I am working on. The benefit of modular building is the ability to use parts of the building like lego blocks to create variations using the same materials and without lots of modelling work. See below for example the blocks on the left can be used to create many variations of the building on the right. The Cambridge photo shoot Texture Pack is available in the Downloads section on this site along with the 3d Models, Photoshop .PSD files and a Prezi tutorial of how to create your own buildings quickly.

Cambridge_Mod_B

Ambient Occlusion How To: 3ds Max, Mental Ray and Photoshop

As mentioned in Basic Compositing in Post Production I will go through how I create an ambient occlusion material and use it in Photoshop. Ambient occlusion can be used to enhance shadows in renders. I have set up a model of a Vespa that I previously made and added some lights to the scene. This is how the render currently looks.

VespanonAO

In a new material slot in the material editor (M on the keyboard) the first thing I do is change the Ambient and Diffuse colours to black and tick on Self-Ilumination.

Ao1
Add a Mental Ray Ambient/Reflective Occlusion material to the Self-Illumination slot and change the samples to 64.
Ao2


Ao5
Open up the Render Settings and in the Processing Tab tick Enable under Material Override, then drag the Ambient/Reflective Occlusion material into the Material.
Ao4
If when you render it is all black make sure Exposure Control is off in the Environment Settings (8 on the keyboard).
Ao3


Then up the max distance in the Ambient/Reflective Occlusion Parameters until you get your desired result. Here is mine.

VespaAO

AO6Save the render and open the original and Ambient Occlusion Render in Photoshop and whilst holding Shift drag the Ambient Occlusion onto the original render and change the layer style to Multiply. You can also change the opacity if need. Here is the final result.

VespaAOF

Basic Compositing in Post Production

I recently completed a couple of new interior renders for an Avro RJ using 3ds Max and Mental Ray. So I thought this would be a good time to explain the basic Photoshop Postwork I go through.

1evp88

Compositing in post production is one of the most important and probably most over looked parts of CG. It was only recently I started compositing different renders to improve the quality of my final images, so I am in no way an expert but this is how I composite my images.

The most important thing is lighting, something that I am yet to master but here are some great links to get you on your way. 8 Tutorials To Make You Fully Understand 3D Lighting In CG. But this will only get you as far as the render output on the image above.

Adjusting the Levels (Image > Adjustments > Levels) in Photoshop will make sure you are getting the most colour range out of your image. Render3ao

Rendering out an Ambient Occlusion Pass from your 3d application is one of the best ways to improve results. The render will look something like the one here. Put it on top of your image in Photoshop and Multiply or Overlay it in the layers, you can also adjust the opacity. I then duplicate and merge the layers and adjust the Levels and the Brightness and Contrast.

When rendering out of 3ds Max I have found the images could do with crisping up. To do this add a Unsharp Mask. (Filters > Sharpen > Unsharp Mask)


Render3zd

To get a Lens Blur or Depth of Field you will need to render out a Zdepth pass. The output should look something like this one. You can override all materials instead of replacing them in 3ds Max (Render Setup > Processing > Material Override > Check the Box and drag the material in.) The last thing I do is adjust the contrast and save the image out. There is so much more you can do but here are the basics of what I generally do.


How to Model, Texture, Light and Render a Macbook in 3ds Max

MacPro.jpg

I have a series of lectures coming up and one of them will be Modelling a Macbook in 3ds Max, here is the first attempt. This video is at about 10x speed and shows how to set up blueprints and model the Macbook using simple primitives and pro boolean. I am not the biggest fan of boolean but in this case they proved very effective. http://www.youtube.com/watch?v=3fbc_jj8MXg In the second video of the series I go through Texturing, Lighting and Rendering a Macbook in 3ds Max. This time it is a brief introduction to materials and texturing. Again the video is at about 10x the speed and shows a simple Mental Ray setup for rendering, materials and adding an animated texture to the object.

http://www.youtube.com/watch?v=stxr7l-yZxM

You can also buy my model from turbosquid.