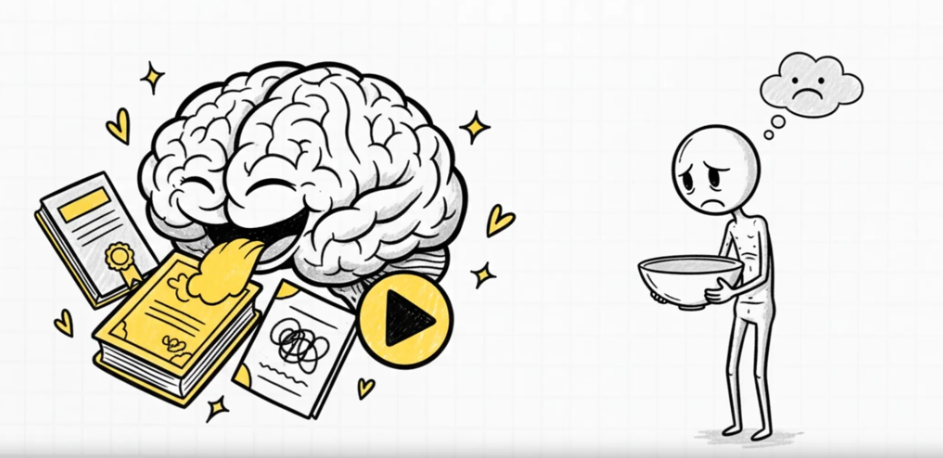
3D News: The Worlds First Animation, AI and Textures

"Simplifying the techniques used in the 3D industry."

Here are 3 things I thought were worth sharing this week:

πŸ“Ί WATCH

Generative Fill in Photoshop Beta

Dive into the future of image editing with Adobe Photoshop's new AI-powered feature, Generative Fill. Part of Adobe's Firefly suite of generative AI tools, Generative Fill allows users to extend images, add and remove objects, and even transform scenes with simple text prompts.

https://youtu.be/7Ew-Bf7PBtY

πŸ“Ί WATCH

The First Ever 3D Animation

This historical video was recently re-discovered after being lost for many years. It was produced in 1972 and is believed to be the world's first computer-generated 3D animation.

https://youtu.be/T5seU-5U0ms

πŸ“– READ

7 Great Places to Find Free 3D Textures

Finding good textures for your projects can be hard. Over on the Enscape blog they have gathered 7 great places you can find textures.

https://blog.enscape3d.com/free-rendering-textures

⭐ REVIEW

Leave a review and you might get featured next week!

Thanks for reading! If you like this newsletter and want to support it, join a course or refer a friend.

Render On!

Want to Advertise in The 3D News? Reply to this email and I'll get back to you!

Unlocking the Hidden Toolbox in 3DS Max: A Game-Changer for 3D Artists

In the world of 3D design and modeling, efficiency is key. The ability to streamline your workflow can save you hours of time and significantly improve your productivity. One tool that can help you achieve this is the transform toolbox in 3DS Max. This toolbox is packed with smart tools that can save you time and make your 3D modeling process smoother and more efficient.

The Transform Toolbox: A Swiss Army Knife for 3D Artists

The transform toolbox in 3DS Max is like a Swiss army knife for 3D artists. It allows you to rotate objects by a specific degree of your choice, based on the viewing angle. This is much faster than selecting an object, turning on angle snaps, and rotating by five degrees.

The transform toolbox also lets you scale objects to a certain size. Even better, you can select an object from your scene and find out its size. This is incredibly useful because it means you can scale your object to fit the reference object you want to replace.


Align Pivot: Centering and Grounding Made Easy

The align pivot tool in the toolbox allows you to center or ground pivots and much more. This is much quicker than going to hierarchy effect pivot center to object or turning on snaps and trying to snap it to the bottom of your object.

The toolbox also allows you to center an object to the scene, which is much more efficient than selecting the move tool and right-clicking in each axis to center it.

Cloning and Shortcuts: Speeding Up Your Workflow

The toolbox allows you to clone next to your object, again based on the viewing angle. Holding shift and clicking will make it an instance, holding 'alt' and clicking will make two copies, and holding shift and ALT will make two instances.

To access the toolbox quickly, you can set up a shortcut, such as Ctrl+Shift+T. When you press this combination, the toolbox appears. This is much quicker than going to find it each time from edit transform toolbox.

Conclusion

The transform toolbox in 3DS Max is a game-changer for 3D artists. It's packed with smart tools that can save you time and make your 3D modeling process smoother and more efficient. By unlocking this toolbox and learning how to use its features, you can significantly improve your workflow and productivity.

So, go ahead and unlock the secret 3DS Max toolbox, and save yourself hours of time. Let me know in the comments what takes up most of your time and we can take a look at speeding it up.

This blog post is based on the video "UNLOCK The Hidden 3DS Max Toolbox You Should Be Using" by Jake, a CGI artist from the UK. He freelances, teaches, and travels the world because of Luxury Visuals. He has been lucky enough to work with some of the world's most exciting designers and brands.

3D News: Animated Traffic, Custom MetaHumans, and Studio Secrets!

"Simplifying the techniques used in the 3D industry."

Here are 5 things I thought were worth sharing this week:

πŸ“Ί WATCH

Animated Car Traffic in 3ds Max FREE

In this quick video tutorial, you will learn how to quickly add animated cars and vehicles to your 3D roads in 3ds Max. You'll discover how to set up and animate vehicles, adjust their speed and direction, and create traffic flow that mimics real-world scenarios.

https://youtu.be/7IPjEZ3vocE


πŸ“Ί WATCH

How to Create a Metahuman with CUSTOM 3D Scan Store Textures

In this tutorial, former Luxury Visuals student Francis Eaton shows us how to create a MetaHuman asset, customize it with your own model and textures, and animate the character using mocap data and marketplace store assets for a seamless and engaging character experience.

https://youtu.be/mIFPvom1bas


πŸ“– READ

IKEA's Secret to Stunning Product Images

The ikea catalog is the most printed book in the world and over 75% of the catalog is 3D. Ever wondered how they make their products look so amazing in their catalogs?

www.luxuryvisuals.com/jaked3d/ikeas-3d-studio

πŸ“Ί WATCH

A.I. Edits Your Images in SECONDS!

In this video, "A.I. Edits Your Images in SECONDS!", you'll see how AI can select specific parts of an image, tweak contrast, and suggest the best settings for enhancing your images.

https://youtu.be/dEF8UksxJdU

πŸ”¨ TOOLS

Adobe Unveils the Future of Creative Cloud

Adobe has unveiled Generative Fill, a feature powered by the Firefly AI model, which allows users to modify images in Photoshop quickly and non-destructively using simple text prompts.

https://news.adobe.com/news/news-details/2023/Adobe-Unveils-Future-of-Creative-Cloud-with-Generative-AI-as-a-Creative-Co-Pilot-in-Photoshop-default.aspx/default.aspx

Thanks for reading! If you like this newsletter and want to support it, join a course or refer a friend.


Render On!

Virtual Cash or Real Cash?

Years ago, I remember a friend once telling me about how proud he was to be the mayor in SimCity, building cities and making virtual cash.

That got me thinking,

"Wouldn't it be cool if I could design stuff in the virtual world that would actually get built in the real world, and I'd get paid REAL money for it?"

So, instead of playing SimCity, I decided to learn programs and create things in the virtual world that would come to life in reality.

Since then, I've helped design planes, yachts, hotels, homes, and shopping malls that have been created in the real world!

And you know what? It takes the same amount of time to learn programs as it does to master a game!

So, instead of playing video games, why don’t you learn programs and create things in the virtual world that would come to life in reality?

AI Laminar Neo: Revolutionizing Image Editing in Seconds

Artificial Intelligence (AI) is transforming the world of image editing, making it faster, easier, and more efficient. In this blog post, we'll explore how AI in Lumiar Neo can optimize your editing process and help you achieve stunning results in a fraction of the time.

AI Masking and Smart Contrast

The first step in the AI editing process is to use AI masking. This feature analyzes the image and identifies different elements, such as the ground and flora. You can then make a selection and edit these using the brush, painting in areas that the AI might have missed. Once you've made your selection, you can use the smart contrast feature to enhance the image further.

Landscape Filter and Foliage Enhancer

The landscape filter allows you to play with the golden hour effect, but the real game-changer is the foliage enhancer. This feature pumps up the foliage in your image, giving it a vibrant, lush look. You can even change the tone to create a more autumnal feel.

Re-light AI and Sun Rays

Re-light AI adds depth to your image by allowing you to adjust the brightness in different areas. You can brighten up the background and darken the foreground, creating a sense of depth and distance. The sun rays feature adds a touch of magic, creating stunning sun rays that you can adjust in terms of number, amount, length, and penetration.

Atmosphere AI and Fog

Atmosphere AI allows you to add fog to your image, creating a mysterious and atmospheric effect. The best part? It saves you tons of time. Rendering fog in 3D can take a long time, but with Atmosphere AI, you can achieve the same effect in seconds.

Mood and Magic Light AI

The mood feature allows you to add lookup tables to your image, changing the overall feel and atmosphere. Magic Light AI adds a glow to your image, perfect for enhancing interior lighting.

Super Sharp and Enhanced AI

Super Sharp analyzes your image and sharpens it for you, while Enhanced AI can add a vignette to your image and create a slight lens effect.

Sky Replacement

One of the most impressive features of AI editing is sky replacement. You can choose from a range of skies, from starry nights to dramatic sunsets, and the AI will seamlessly integrate them into your image, even adjusting the reflections to match.

Conclusion

So, is AI a Photoshop killer? It certainly offers a range of powerful features that can save you time and help you create stunning images. But don't just take our word for it - try it out for yourself and see the difference AI can make to your image editing process.

Luminar Neo: https://skylum.evyy.net/jake10 use 'jake10' for a discount after the trial.

3D News: πŸš€ Insider Tips, AI Insights, and Next-Gen Tools!

"Simplifying the techniques used in the 3D industry."

Here are 3 things I thought were worth sharing this week:

πŸ“Ί WATCH

Tips for beginner 3D artists - Jake Denham | From Zero to Hero

Here’s a presentation I did for Chaos where I shared how I entered the world of arch viz, and how to find work when you are just starting out.

https://youtu.be/SslwzYHJdiI


πŸ€– A.I

Ease AI Anxiety

If you are feeling AI anxiety and worrying about AI taking over. Then this is a must-read. I first read it in 2018, but reading it again in 2023 hit differently. 

https://amzn.to/41MQBiY


πŸ”¨ TOOLS

MetaHuman Animator

MetaHuman Animator offers a new approach to animating facial expressions by utilizing iPhone or stereo helmet-mounted cameras. 

https://www.unrealengine.com/en-US/blog/new-metahuman-animator-feature-set-to-bring-easy-high-fidelity-performance-capture-to-metahumans

Thanks for reading! If you like this newsletter and want to support it, join a course or refer a friend.

Render On!

3D News: Auto Lighting, Merging Drone Footage, and AI-Powered Tools!

"Simplifying the techniques used in the 3D industry."

Here are 4 things I thought were worth sharing this week:

πŸ“Ί WATCH

3D Rendering for Interior Designers on Skillshare

The new Corona for 3ds Max class is now on Skillshare for all of you that use Skillshare, if not here is a month for free. Plenty of time to watch the class πŸ˜€

https://skl.sh/3VCv3Dm


πŸ”¨ TOOLS

Auto Light by D95 Design

D95 Design unveils Auto Light, an innovative script for 3ds Max that streamlines the process of placing lights in a scene, making it easier than ever to achieve optimal lighting.

https://youtu.be/tukCCqve4iE


πŸ“Ί WATCH

Adding 3d Elements to Drone Footage

Ken Hitsman from Hitsman Design followed along with the Camera Matching 3D course and came up with this.

https://youtu.be/h4mijPCUjjg


πŸ”¨ TOOLS

An AI-powered visualization add-in for SketchUp

Veras for SketchUp is a groundbreaking tool that integrates AI directly into your SketchUp models, I think we are going to see more tools like this in the future.

https://www.evolvelab.io/veras

Thanks for reading! If you like this newsletter and want to support it, join a course or refer a friend.

Render On!

3D News: Corona Features, 3ds Max 2024, and Photorealism Tips You Need!

"Simplifying the techniques used in the 3D industry."

Here are 3 things I thought were worth sharing this week:

πŸ“Ί WATCH

Corona Features: Scatter, Pattern & Displacement

Dive into this quick guide covering Chaos Scatter, Corona Pattern, and Displacement, and learn when to utilize each feature to elevate your 3D projects.

https://youtu.be/46djld89efU


πŸ”¨ TOOLS

Autodesk releases 3ds Max 2024

Check out the recent enhancements in 3ds Max: the new Boolean modifier for clean geometry, Array updates for procedural nature scenes, and improved Color Management with Arnold for consistent visuals.

https://youtu.be/FJ6ytd7vjZM


πŸ“– READ

6 QUICK TIPS To Increase Photo Realism

COMPUTER POWER > MORE POLYGONS > MORE REALISTIC

Want to know how to create photorealistic images? In this article, I’ll show you 6 quick tips for increasing photorealism in your 3D scene. I will be demoing with V-Ray for 3ds Max but most of these tips will be useful for any 3D artist in any 3D software.

https://www.luxuryvisuals.com/jaked3d/photorealism

Thanks for reading! If you like this newsletter and want to support it, join a course or refer a friend.

Render On!

IKEA's Secret to Stunning Product Images

The ikea catalog is the most printed book in the world and over 75% of the catalog is 3D. Ever wondered how they make their products look so amazing in their catalogs?

Today, we will focus on using the Chaos Corona Renderer and 3Ds Max to create eye-catching product visuals, just like you see in the Ikea catalog.

This image shows what you can achieve by following the steps outlined in this tutorial.


The first step in creating a product render is to have a product to render. Fortunately, with Chaos Cosmos now included with Corona, we have access to thousands of 3D models.

1. Open Cosmos from the Corona toolbar to browse the 3D models and choose the one that you would like to use.

Chaos Cosmos in 3Ds Max.

2. Once you have your product, it is time to set up your studio. You can use an HDRI to light the scene, and Cosmos includes several studios that you can use.

A HDRI from Chaos Cosmos

3. You can also modify the scene by adding a pure white background in the Render Settings > Direct visibility override.

The 3d product with direct visibility override on.

4. To add shadows create a plane and apply a Corona Physical Material to it. Hit render and turn of the ACES OT under the tone mapping tab to make sure the background is pure white.

Product render with a pure white background and shadows.

By following the steps outlined in this tutorial, you will be able to create your own studio and product shot. Once complete, you'll be able to use your studio over and over again to render products for your portfolio or for your clients.

Every few years I make a course about what I’ve learned about 3D. If you want to join the 25,000 students who are already learning with me click here.

From Beginner to Pro: 3D Rendering with Chaos Corona & 3ds Max

Every few years, I create a course to share my 3D knowledge, and I'm grateful to all 25,000 of you who have joined me on this journey so far.

Over a year ago, I became a part of the Corona team to develop tutorials for their YouTube channel, which has expanded my expertise tremendously. (Please note that this course is not affiliated with Chaos)


Remember the original Zero to Hero Corona course? It was becoming outdated, and many of you requested an updated version featuring the latest tools. Well, here it is!

  • A comprehensive, step-by-step course covering all essential aspects of 3D rendering and architectural visualization.

  • Practical, hands-on lessons, allowing you to apply the skills you learn in real-world scenarios.

  • An engaging and supportive instructor providing personalized guidance and feedback.

  • A course incorporating the latest techniques and industry trends, ensuring you stay competitive in the market.

  • Flexible learning options catering to various experience levels and backgrounds, from beginners to experienced artists.

You can get the course at the lowest price I'm allowed to offer on Udemy by clicking here!

With a 30-day money-back guarantee, you can get a refund, no questions asked, if the course isn't a good fit. I'm confident you'll love it, Alan and Sam did…

Join the 25,000 students already enhancing their career prospects and finding new opportunities in the 3D, architectural, and interior design industry.

From Beginner to Pro: 3D Rendering with Chaos Corona & 3ds Max

These guys loved the course…

Here are some comments so far…

β€œThe course is easy to understand because the explanation given is crystal clear.”

β€œThis will be a great course for students who want to learn the updated skills of 3ds max and Corona. If you want to learn Corona this is an easy pick.”

β€œModeling a kitchen can be a challenging task, and it is not commonly covered in Udemy courses. It takes great effort to make it look effortless, so great job to Jake for doing so.”

β€œModifying Chaos Cosmos assets without affecting the UVWs is something many people are interested in. Who doesn't love Chaos Cosmos? I always want to learn how to modify its assets. For me, this is the best part.”

From Beginner to Pro: 3D Rendering with Chaos Corona & 3ds Max

Don't miss out on this fantastic opportunity to level up your 3D rendering skills and create stunning, photorealistic renders that captivate audiences.

Any questions, you can drop me a message, but in the meantime here are a few answers to the common ones…

Q: I'm a complete beginner with no experience in 3D rendering or architectural visualization. Is this course suitable for me?

A: Absolutely! This course is designed with flexibility in mind, catering to all experience levels – from complete beginners to experienced artists. The step-by-step lessons guide you through the process, ensuring you build a strong foundation in 3D rendering and architectural visualization.

Q: How long will it take for me to see progress in my 3D rendering skills?

A: The course is structured to help you see progress quickly. As you complete each hands-on lesson, you'll gain practical experience that you can immediately apply to real-world scenarios. The more you practice and engage with the course content, the faster you'll see improvements in your skills.

Q: What software do I need to follow along with the course?

A: The course focuses on 3D rendering with Chaos Corona and 3ds Max. To get the most out of the lessons, it's recommended that you have access to these programs. You can download trial versions of Chaos Corona and 3ds Max if you don't already have them installed.

Q: Will the course be updated with new content or techniques in the future?

A: Yes! The course is designed to stay current with the latest techniques and industry trends. As new tools and methods become available, the course will be updated to ensure you remain competitive in the market.

Q: What if I enroll and find that the course isn't a good fit for me?

A: No problem! There's a 30-day money-back guarantee. If you find that the course isn't right for you, simply request a refund within 30 days, no questions asked. I'm confident you'll love it, but the guarantee ensures you can try it risk-free.

Render on!


3D News: IKEA-style Images, Evermotion Assets & Your Chance to Shine!

"Simplifying the techniques used in the 3D industry."

Here are 3 things I thought were worth sharing this week:

πŸ“Ί WATCH

Images Just Like Ikea in Under 5 MINUTES!

Have you ever wondered how IKEA creates its stunning product images? In this video, we will focus on using Chaos Corona Renderer and 3Ds Max to create eye-catching product visuals, just like the ones you see in the IKEA catalog.

https://youtu.be/UDyKJ-LsLLg

πŸ”¨ TOOLS

Evermotion Assets Added to Chaos Cosmos

Chaos Cosmos partners with Evermotion, a leading name in archviz assets, adding over 350 new assets to the content library, enhancing the visual quality and realism of your scenes.

https://www.chaos.com/blog/exciting-chaos-cosmos-update-adds-evermotion-assets

❎ AWARDS

Showcase Your Talent with Chaos' Call for 3D Artist Submissions

Chaos invites 3D artists to submit their best work in various categories for a chance to be featured on their website, gallery, blog, social media, and the upcoming Chaos Student Showreel, offering increased visibility and networking opportunities.

https://www.chaos.com/submit-your-art

Render On!

The Ultimate Way to Learn 3ds Max for 3D Modeling and Render Projects

The past few years saw a huge rise in demand for high-quality 3D content. Due in part to curfews and restrictions on outdoor activities, and the increased demand for fresh content. Brands are now looking for ways to publish new content daily across multiple channels.

This is a tough task for photography and video to fulfill alone. This will make 3D content almost essential for any brand that wants to meet content demands. The market for 3D is growing rapidly and is expected to remain high through 2022 and far beyond. This momentum makes 3ds Max an in-demand skill.

What is 3ds Max?

3ds Max is the industry-standard 3D modeling and rendering software, used by hundreds of professionals around the world as well as beginner users. 3ds max is used to create three-dimensional models and environments for animation, simulation, video games, and architectural visualization.

It began being developed in May 1988. In the 1990's it moved from its original DOS-based interface into one based on Microsoft Windows with menus and has since developed into what you recognize now.

The 3ds Max user interface in 2022

What are the benefits of learning 3ds max?

  1. It is a great tool for the creation of visualization, animation, 3d graphics, and visual effects.

  2. 3ds max can help you create 3d models, character animations, and control rigs for motion graphics.

  3. It is a good beginner and expert software to use when you want to learn about architecture, design, animation, film making, and other visual effects-related activities.

  4. It is highly transferable, modeling, animation, and 3D design can be applied in any field. If you ever want to shift industries you can move to films, VFX, advertising, architectural visualization, and much more.

Where to start with 3ds Max?

There are so many things that you can do with 3ds Max. If you are just starting out, you should start by learning the basics of modeling and rendering from a tutorial before moving on to rigging and animation.

Are there any free resources that can help me learn how to use 3ds max software?

There are many online tutorials that can help you learn how to use 3ds max software. Some of the best resources include:

  1. Autodesk Official Site

  2. Introduction to 3ds Max Tutorial

  3. How To Render Your First Photo Realistic Image

Which online training courses do you recommend for learning 3ds max?

3ds Max is a 3D modeling and animation software that can be used for designing buildings, characters, or anything else. So it is important to take it step by step and master the foundations. It is a good idea to take a structured course for this reason.

After you learn the basics it is worth looking into specific courses in the area you want to focus on. If you are looking to learn 3ds max for architectural rendering, then you should consider enrolling in an online training course like the 3D Artist course.

Need Help Choosing an Online 3DS Max course?

It all depends on what you want to learn. But you should look for a course that offers a 30-day money-back guarantee in case the instructor is not your cup of tea.

It is also important that as soon as you sign up you schedule time in your calendar to take the course. If you do not make time for the course you will not complete it. Even when you have purchased the course you still have to do the work and complete it. If it is not a priority for you then do not waste your money.


Should I learn 3D Modelling first?

Complete the free Introduction to 3ds Max Tutorial first, then you will understand how to use 3ds Max. Once complete you can then work through all of the required steps to master 3ds Max. The next course is structured in order and includes a whole section on 3D modeling with 3ds Max.

Is there a 3ds Max community I can join for help, tips, or just showing off my work?

You are welcome to join the Luxury Visuals Academy community. It is a private online community of like-minded, supportive artists. Where you can get the answers you need and meet other 3D artists.

How long does it take to learn 3ds Max?

You will be able to produce images within a few weeks. But you will need to build a decent body of work. Try and get an idea of who you want to work with and tailor your portfolio in that direction. Make sure to demonstrate your modeling, lighting, and rendering skills with only your best work. Less is more in this case.

How much can I sell each rendering for?

Back in 2011 Clog published results from a survey as follows:
In House: Intern $0-$600, Unlicensed Design Staff $650-$850, Licensed Architect $700-$1100.
Outsourced: Economy $800-$900, Average $2500-$5000, Premium $6000-$10000.


Other questions related to Luxury Visuals Academy

Luxury Visuals is a resource for 3ds Max and V-Ray training. It offers online courses, workshops, and more to help students learn 3D software programs. Below are some common questions you may have, also feel free to ask any questions in the comments or the community group.

Does the 3ds Max and V-ray course on your website include all the Udemy lecture materials and courses?

The course on the website includes all of the lecture materials + some bonuses. As well as a certificate of attendance. It also includes the 3D 360 Walkthrough and Camera matching to 3D into video courses too. It is much simpler to take the course as a whole from start to end, than jump about from course to course on Udemy.

What is the main software you use?

Software I use regularly; Adobe Creative Suite (Photoshop + After Effects), 3ds Max, and V-Ray for 3ds Max.

What is V-Ray?

V-ray is a rendering plugin used with common 3d software applications like Max. It provides global illumination and advanced lighting, materials and creation capabilities to generate realistic lighting effects, and materials as well as highly organic volumetric objects.

Is it necessary to have Autocad / Revit / Archicad installed on my system too?

You will receive various file types from clients, luckily the majority can be brought straight into 3ds Max.

In the very beginning, you started out working for a company. Would you say that this would be beneficial for me too?

The experience of working in-house is valuable. But not essential. As long as you understand the value of systems, workflows, and structure.

How do I start searching for such companies to apply for a job? How do I even know they are legit if I'm sitting on the other side of the world?

You build a portfolio, on Squarespace and Behance. Publish work regularly and talk with studios and architects. Sites like Indeed are good for the job search. I attend 3ds London each month and companies are crying out for talent.

The key to success in 3ds Max is being a hard worker. If you put in the time and effort, you will reap the rewards. The 3ds Max software is one of the most powerful rendering tools available, and it's also a very versatile tool that can be used for many different purposes. With enough dedication and determination, you can become an amazing 3ds Max artist and make a name for yourself in this industry.


About Luxury Visuals: Over 20,000 students have enrolled in our courses. We provide the best 3ds Max and V-Ray training for professional users. If you are a beginner user of 3ds Max or V-Ray we can help you to improve your skills and make more money with these software tools. Enroll in our free course and make your first photorealistic render today!

CGI News November 21

"Simplifying the techniques used in the CGI industry."

Here are 3 things I thought were worth sharing this week:

πŸ”¨ TOOLS

Corona Renderer 8

Corona 8 is due for release at the start of 2022 and it sounds like some major updates are on the way. Alongside the updates, I will be creating all new content for the Corona course. See the full press release on the Corona blog here: https://blog.corona-renderer.com/corona-in-2022-new-features-visuals-licensing-and-more/

πŸ“– READ

6 QUICK TIPS To Increase Photo Realism

COMPUTER POWER > MORE POLYGONS > MORE REALISTIC

Want to know how to create photorealistic images? In this article, I’ll show you 6 quick tips for increasing photorealism in your 3D scene. I will be demoing with V-Ray for 3ds Max but most of these tips will be useful for any 3D artist in any 3D software.

Read the full post here: https://www.luxuryvisuals.com/jaked3d/photorealism

πŸ“Ί WATCH

It's that time of year...

If you have a new skill you want to learn, a model you want, or some software you have been eyeing up there are tons of deals on at the minute. Here is a list of some of the best ones.

https://www.luxuryvisuals.com/jaked3d/2021

Thanks for reading!

Render On!

It’s that time of year…

Black Friday and Cyber Monday have become a great time to get 3D software, models, and courses. Mainly because everyone has a sale on!

If you have a new skill you want to learn, a model you want to buy, or some software to buy, now is the time to get involved.

Here are some of the best offers in one place!

  • Need a website? Squarespace is offering 10% off. You are reading this on a Squarespace site. Click Here to see the offer. (Use BLKFRI10)

  • Need Equipment? Here is all the stuff on my desk… Click Here.

  • Need Cloud Credits? Not using Chaos Cloud yet? You should, Click Here for free credits. ⭐ Chaos is also offering 20% off until 29th November using BF21 on checkout.

  • I am offering Every Course I have released in a special bundle. Click Here!

  • Need Photoshop, After Effects, or the whole Creative Cloud!? Adobe is offering between 39% to 70% off for the year! Click Here.

  • Need Forest Pack or Rail Clone? iToo have you covered with discounts on all software. Click Here.

  • BBB3viz is selling his incredible models with a 40% discount. Click Here.

  • Turbosquid has up to 50% off on selected 3d models. Click Here.


πŸ™‹β€β™‚οΈ Please note I will earn some referral commission on some links at no cost to you.

6 QUICK TIPS To Increase Photo Realism with 3ds Max and V-Ray

EASY Tips For Photorealism in 3D | Improve Your Realistic Rendering

Want to know how to create photorealistic images? In this article, I’ll show you 6 quick tips for increasing photorealism in your 3D scene. I will be demoing with V-Ray for 3ds Max but most of these tips will be useful for any 3D artist in any 3D software.

Part of the reason that 3d rendering is getting more and more realistic every year is due to more computing power. Everything you see in a 3d rendering is made up of polygons. More computing power means we can render more polygons than ever before. More polygons mean more details and more details mean more photorealistic models.

COMPUTER POWER > MORE POLYGONS > MORE REALISTIC

Our job in 3d graphics is to convince the viewer that what they are looking at is real. We are modern-day magicians just with a whole lot of tech and computer power. But the tech and power alone won't cut it... so let's take a look at 6 tips to convince your viewers your visuals are real...

1. Life's Not Perfect

The most obvious giveaway that an image is a 3D render is that it's too perfect. In this image, the pictures chairs and table are all dead straight. There is no way you could do this in reality if you tried.

So a good thing to do before render time is to rotate and move things about ever so slightly. Just note that we usually do this with Snaps by degree on, so it rotates by 1 degree or 5. But now is a good time to turn this of and make very small rotations and movements.

You can see the difference when we compare these 3d renders.

If you want to explore adding more chaos to your 3d renderings, check out the Physics video where we look at stacking objects and using gravity, wind, and explosions to randomise placements of objects.

2. Same Same But Different

Using the same model is cool and all but when you have a few lined up you are going to start noticing that they are all exactly the same. In this example, we can see that the wood grain is in the same place on each chair.

This can be easily solved, even if the objects are instanced. Go into the material editor. Grab the material using the eyedropper. Add a VRayUVWRandomizer map. Plug the same one into all of the maps. You can choose by name and this will offset the texture depending on the name. Turn off the UV Rotation as we do not what the texture to rotate. And now each chair will have varied textures

3. Go Hard Or Go Home

Another giveaway that something is a 3d model is the hard edges. When we build in 3d the edges are hard by default. We can overcome this in a couple of ways. The first way is with the Chamfer modifier.

The second way is by doing it in the material with a map. Add a VrayEdgeTex Map. And we can see that has rounded the corners for us, making a more photorealistic model. 

4. Make Some Noise

Nothing in life is really flat, so nor should your 3d models. To add some variation you can Quadify Mesh. This will add some more faces to your object and then add a noise modifier. Try not to overdo this one you barely want to notice it.

5. Go Organic

It's not just hard objects that we can soften up. Years ago natural objects such as trees, plants, flowers, pillows and fabric were hard to make look realistic in 3d renders because we had so few polygons to play with.

But now we have more than enough to make things look as real as real life. With Chaos cosmos now there is no need not to have a few organic objects to your scene.

Adding a throw and positioning it with a FFD modifier is going to add realistic details. Or you can use the cloth modifier to do something similar.

Talking of the cloth modifier, we can combine the cloth modifier with cushions to drop them onto the sofa. This will make it sit nicer than if we just try to place it.

Watch the video below for the steps…

6. Keeping It Real

Keeping things real is important if you want your 3d renders to look real. This goes for lights, materials, and cameras. If you use real-world constraints in your 3d images you will get real-world results. The closer to reality our virtual world is the more realistic it will seem.

This is why it is a good idea to keep materials on a real-world scale. In the V-Ray Asset Browser keep Real World on. Then whenever we create an object and add a UVW Mapping modifier with real-world on, it will all come in at the correct scale. This is a really useful habit to get into if you want photorealistic images. 

Real-world means we are telling 3ds max that this texture is 100cm x 100cm in real life.

This goes for models too. Just eyeballing and scaling is pretty lucky dip and I would avoid this where possible. Most models available now are modelled to real-world size. But if they are not to real-world you can always check the manufactures website and make sure you are matching the exact dimensions.

There are many other things that will affect your ability to create photorealistic images, high-quality materials, realistic details, image resolution, etc... But creating cutting-edge photorealistic 3D images is no longer reserved for 3D professionals with advanced software or the graphics guru. Check out the Learn 3D page for a simplified look at creating 3d renders

Render On!

Got Problems?

Got Problems?

You can get frustrated or you can look at it as a test to find a solution.

Once you get to the Solution,

  • you get to keep that solution.

  • you get to use it over and over again

  • you get to stack your solutions into a pile

when you stack your Solutions you get Experience.

What do problems mean? Solutions!

What do Solutions make? Experience!

What do you need? Experience!

Problems Solved = Solutions // Solutions Multiplied = Experience

.... Welcome the problems :)

Render on!

P.S Want some FREE Chaos Cloud Credits? Click Here!

You're Not A 3D Artist. 😲

You're Not A 3D Artist. You're a 3D Problem Solver. You get asked for something by a client. You then get to work on how to create it.

We get asked to do things and we figure it out.


In your career, you will be given models, files, drawings, footage, or scripts from all over the place. You need to work out how to get it into software, create it, render it, use it, composite it or send it... We are problem solvers. That's the job.


It's not just knowing how to do things. It is knowing how to solve what is thrown at you. How do you get better at solving what is thrown at you? Experience


How do we get experience? By creating a solution to a problem.
When you have solved multiple problems (solutions) you get experience.

Problems Solved = Solutions // Solutions Multiplied = Experience

Jobs won't always be easy.
Having experience will make them easier.
Experience is just having solved more problems.

Go solve some problems 😊

Render On!

No Time To Prepare?

What did you think of Murphy's Law? Did you get Practicing?

The reality is you need to practice like you are possessed. 

But I know... what if you don't have the time?

Well, did you know that Urgent (emails reply's, tidying up) and Important are not the same? 

Urgent just gets you back to baseline. (inbox 0, having a clean house)

Important is when future you looks back and has achieved something you are actually proud of. 

The most urgent thing should be to schedule time for the important and make it sacred.

That feeling of unanswered emails, people waiting on you is uncomfortable. That uncomfortable feeling needs to be translated from urgent things to important things. 

You want to feel that discomfort when the important work is not done.

Here is some important work for you... Click Here

Adversity Is Coming

Adversity is going to come, not if, but when.

The client will change things,
your computer will break,
software will crash...

You will not get through your career without encountering challenges like these.

But what can we do about adversity?

Murphy's Law! Heard of it?

Murphy's Law! Heard of it?

Here's what we know...

  1. We know "anything that can go wrong will go wrong"

  2. We know that Luck favors the Prepared.

  3. Training is Preparation.

Professionals train, athletes train, we should train.

Why?
The better we prepare the better we can deal with the situation.

πŸ‹οΈβ€β™‚οΈ You can’t walk into a gym and lift big straight away.
You won’t get through projects without heavy lifts.

⚽ Professional Footballers are good. But they still train all week. What for? Match Day!
Your Client Projects are your Match Day.

CLIENT PROJECTS = MATCH DAY

You train and practice so you know the best strategy for your Client Projects.

We are not just trying to make better images we are making better abilities, skills, and techniques.

Skills give you options.

ο»Ώ

You can't control what adversity will come. But you can control how you will respond to it.

Don't focus on the result, focus on the day-to-day grind and prepare for the high-pressure moments.


We train, so when adversity comes we will be ready.

Want my best training? Click Here