


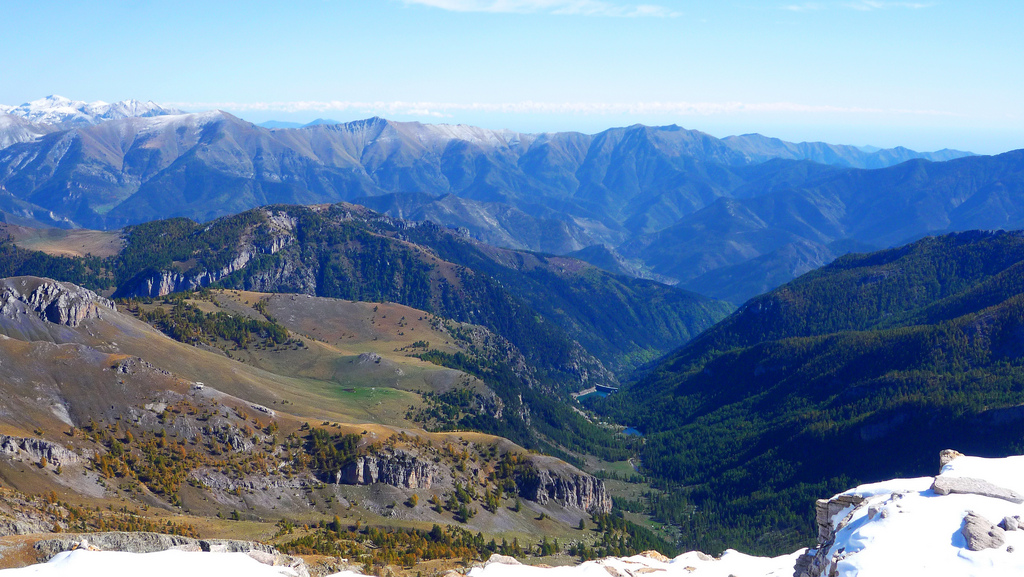
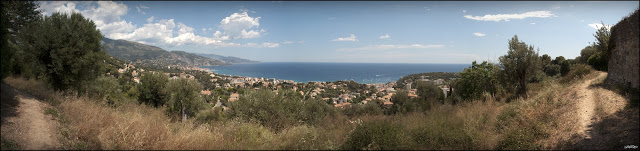
I have just updated the Photos section of my Portfolio with this panorama from my trip up Mount Bego.

I have just updated the Photos section of my Portfolio with this panorama from my trip up Mount Bego.

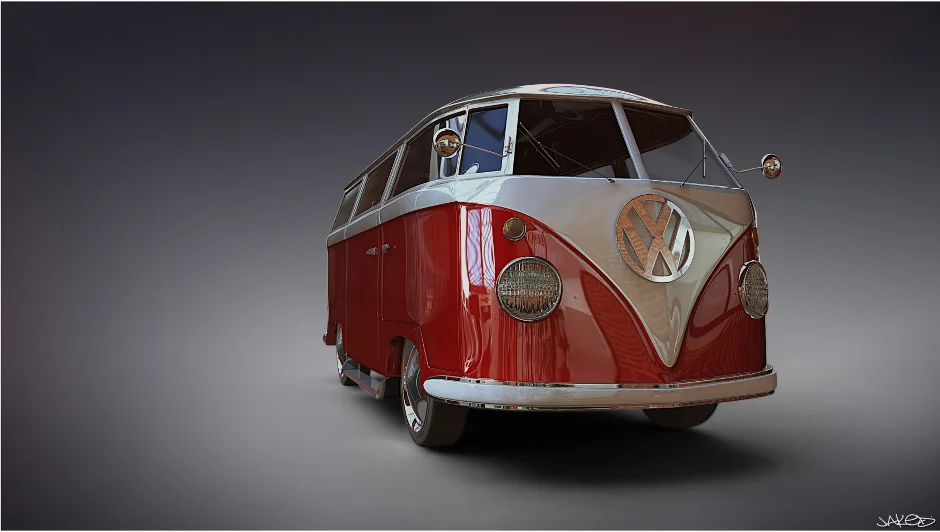
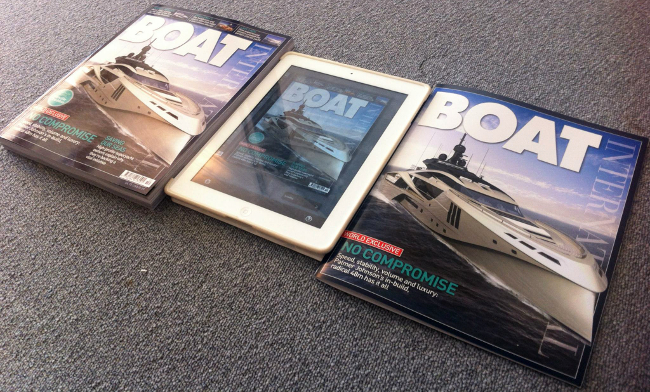
I am happy to present an image that is on the inside cover of three magazines, Yachts International, Showboats and Boat International. The representation of the 48 metre SuperSport Yacht was created using 3ds Max, Vray and Photoshop.
 Apps I have found apps a great incentive.
I am currently using the free version of Map Draw to track the runs I do, I then email the map to my friend to show off! For my never ending todo list I love using Epic Win. This app turns your todo list into a RPG game.
Apps I have found apps a great incentive.
I am currently using the free version of Map Draw to track the runs I do, I then email the map to my friend to show off! For my never ending todo list I love using Epic Win. This app turns your todo list into a RPG game.Seinfeld's Productivity Secret Credit has to go to Lifehacker for this great tip. Stick up as many calanders as you need and write the goal on top. Each day put a X if completed. The idea is not to brake the chain and it works! Here is the article How Seinfeld's Productivity Secret Fixed My Procrastination Problem

Posture I wanted to improve my posture at my desk and I also wondered why was I getting so tired from sitting at a desk. Some people suggested that getting tired is not always due to mental fatigue. If you sit awkwardly at your desk it can make your muscles tense. If you stay in the same position for a long time tensed all day this can make you tired. The solution sounds quite easy, just take a moment to notice how you are sitting and relax.
Getting Moving I was interested to see how much I was moving daily, the recommended amount per day is 10,000 steps. I bought a pedometer (I am sure there are apps) and I now aim to beat the previous days steps. This encourages me to jog in the mornings and take the steps instead of the evaluators. I am currently averaging 10,461 steps per day.

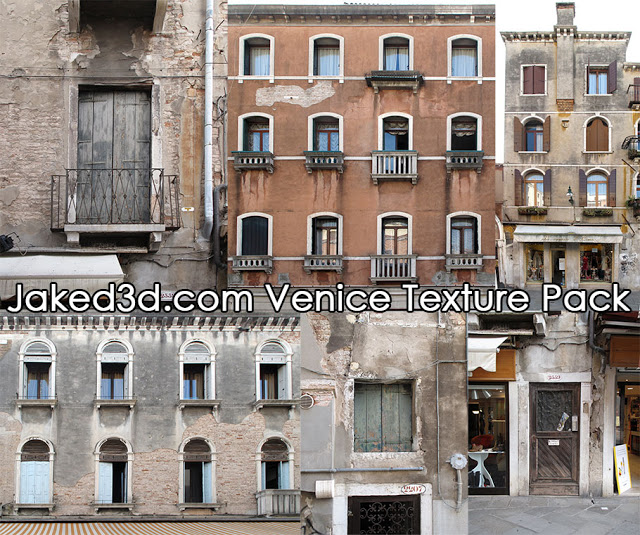
Jaked3d-Venice-Texture-Pack
As promised here are 36 high resolution textures I took when I was in Venice. Feel free to use them as you like.


Here are a few things I have learnt this month. 1. If you can not Group objects in 3ds Max then with the objects selected hit the unlink button on the left of the main toolbar. Then try and group it and it should work. This happens to me when I import files from AutoCAD and other software.
2. Camera Converter. To quickly add cameras I hit Ctrl+C in the 3ds Max viewport this is great when selecting views with others. But if you are using Vray it can be a pain to line the Vray Physical Camera up. This is where Anything to Physcam from Lele's Vray Tools on script spot is really great. There is a good video on how to use it from Alex over at Vray-Studio.
1. If you can not Group objects in 3ds Max then with the objects selected hit the unlink button on the left of the main toolbar. Then try and group it and it should work. This happens to me when I import files from AutoCAD and other software.
2. Camera Converter. To quickly add cameras I hit Ctrl+C in the 3ds Max viewport this is great when selecting views with others. But if you are using Vray it can be a pain to line the Vray Physical Camera up. This is where Anything to Physcam from Lele's Vray Tools on script spot is really great. There is a good video on how to use it from Alex over at Vray-Studio.
3. Cleaner. I was having trouble with a scene that was taking ages to load and save. I also had to turn off autoback and it really got hard to work with. Then I found Cleaner on script spot. This amazing tool got my file down from around 1gb to 200mb!
 4. Remove Missing Plug-ins. I started to use Rebus Farm and I had a plug-in that Rebus did not. They are quite good with having Plug-ins but I could not send it until I sorted it. This can be quite a pain to resolve, but not with Remove Missing Plugins from Martin Breidt. Really easy to use and extremely useful.
5. How to setup Depth of Field in 3ds Max. A great reminder on setting up a DOF pass in 3ds Max from Onno Van Braam.
6. Wireless Trackpad and Keyboard iPhone App. This great app from Logitech turns your iPhone into a mouse and you can type to. This is handy when watching films on the TV from the laptop and not wanting to have to move.

 I have added a photo section to my portfolio area including this image I recently took at Roquebrune Cap Martin.
Recently I have been trying out quite a few scripts and plugins to speed up my work flow in 3ds Max. I highly recommend browsing scriptspot.com for useful scripts. But to save so time and kick you off here is what I have been using recently. Please note that not all of these are available on Sciptspot but there is a link to each download. So in no particular order here are my Top Five Free 3ds Max Scripts and Plugins. Wireframe Render jokermartini.com/2010/04/30/wireframe-render/ Wireframe Render is a script from John Martini over at jokermartini.com. I have found this one very useful for creating wireframe renders for Turbosquid for example. Wireframe Render uses a simple interface that enables the user to quickly and easily create wireframe renders. I would also recommend checking out some of John's other cool tools available at jokermartini.com/extras/ including cobwebs and Select Intersectors.

https://vimeo.com/26107414 Center and Reset www.scriptspot.com/3ds-max/scripts/frodos-magic-scripts-pack This neat script is from Frodo's Magic Scripts Pack. It resets the xform on an object and centers the pivot point in one click. I use this alot and find it to be a big time saver.
 Ivy Generator www.guruware.at/main
Ivy Generator hass been around for a while now and I think it is great. I am always looking out for places I can put it in my scenes because it looks great and it is so easy to use. It is also very customisable with your own leaves etc. Here is a great video tutourial from Sachin Joshi over at CGTuts.
 Hopefully some people will find these free textures useful . They are from the Medieval Village of Roquebrune in the South of France, not to far from me. Please feel free to use them for whatever you like. In the rar file there are doors, walls, windows and a view over the village.
http://www.youtube.com/watch?feature=player_embedded&v=iJaPhuxepIs


 I headed over to Utrecht for the End User Event this week. The event is held in the Florin Pub where the rooms for the talks also are. A total of 5 rooms made it difficult to decide what to see or not. Luckily a lot of the speakers presented their talks more than once. I arrived in the afternoon on Thursday and started with the 3ds Max Expert Panel which was made up of of Neil Hazzard, Zap Andersson, LouisMarcoux, Alex Horst and Jamie Gwilliam. In this session we could ask anything we liked about 3ds Max and any issues we had, this was a great start to the event.


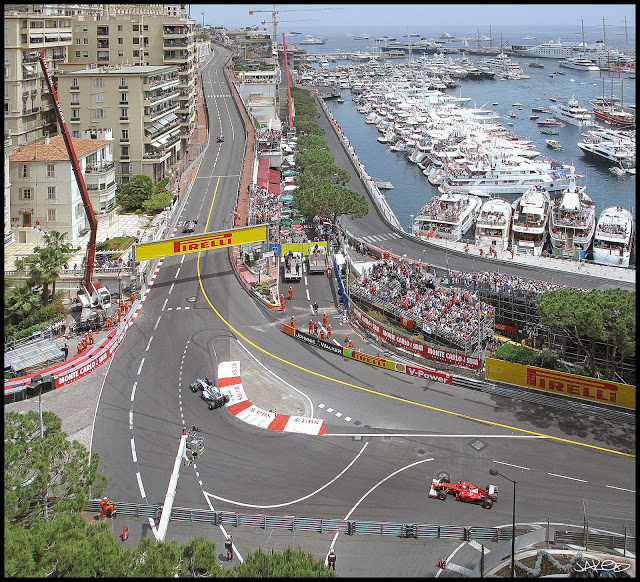
This weekend was Monaco Grand Prix and I was lucky enough to be able to watch from the balcony at work.

http://www.youtube.com/watch?feature=player_embedded&v=6aU2s85Zw3A

So I downloaded the software from here. The software comes with some good tutorials and the program is pretty straight forward to use. For the object I wanted to create I took 42 photos spinning around the object. I uploaded them and waited for Autodesk to email to let me know it was completed. A couple of the images were too dark so the object I received was not 100% but 42 images is probably the minimum I would suggest.
It looked pretty good if I do say so myself. Next, what I was most excited about was getting it into 3ds Max. This was simple, File, Export, FBX and import into Max, this is what I got below.

The scene contains cameras where all the shots were taken from, which could come in handy. I then opened up the Material Editor and selected the material from the object. There were two in this case. The file Autodesk emailed me contained to texture sheets which I remapped to the correct location and below are the 2 texture sheets and the result i got.


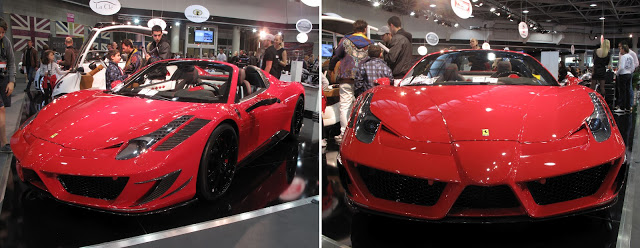
It has been a busy couple of weeks over here. On Wednesday I went to the Milan Furniture Show and returned to Monaco on the Friday night. Then I was off to Top Marques in Monaco on Sunday. Milan furniture show was great and so was Milan. I could have really done with a week there as there was so much to see. Top Marques is 'the most exclusive supercar show in the world' and it did not fail to deliver. Below are some pictures from Top Marques.


 "Key Learning
Describe the hardware required for iray and explain how to use cloud rendering with iray
Explain what iray is
List the advantages and disadvantages of iray
Describe the differences between iray and previous rendering technology"
... Autodesk University
"Key Learning
Describe the hardware required for iray and explain how to use cloud rendering with iray
Explain what iray is
List the advantages and disadvantages of iray
Describe the differences between iray and previous rendering technology"
... Autodesk University