


Here are a few images from a collaboration with the multi-award winning 161 London. After visiting the apartment in Park Lane I got to work on creating the visuals. The project is due for completion any day now, so stay tuned for the final images.
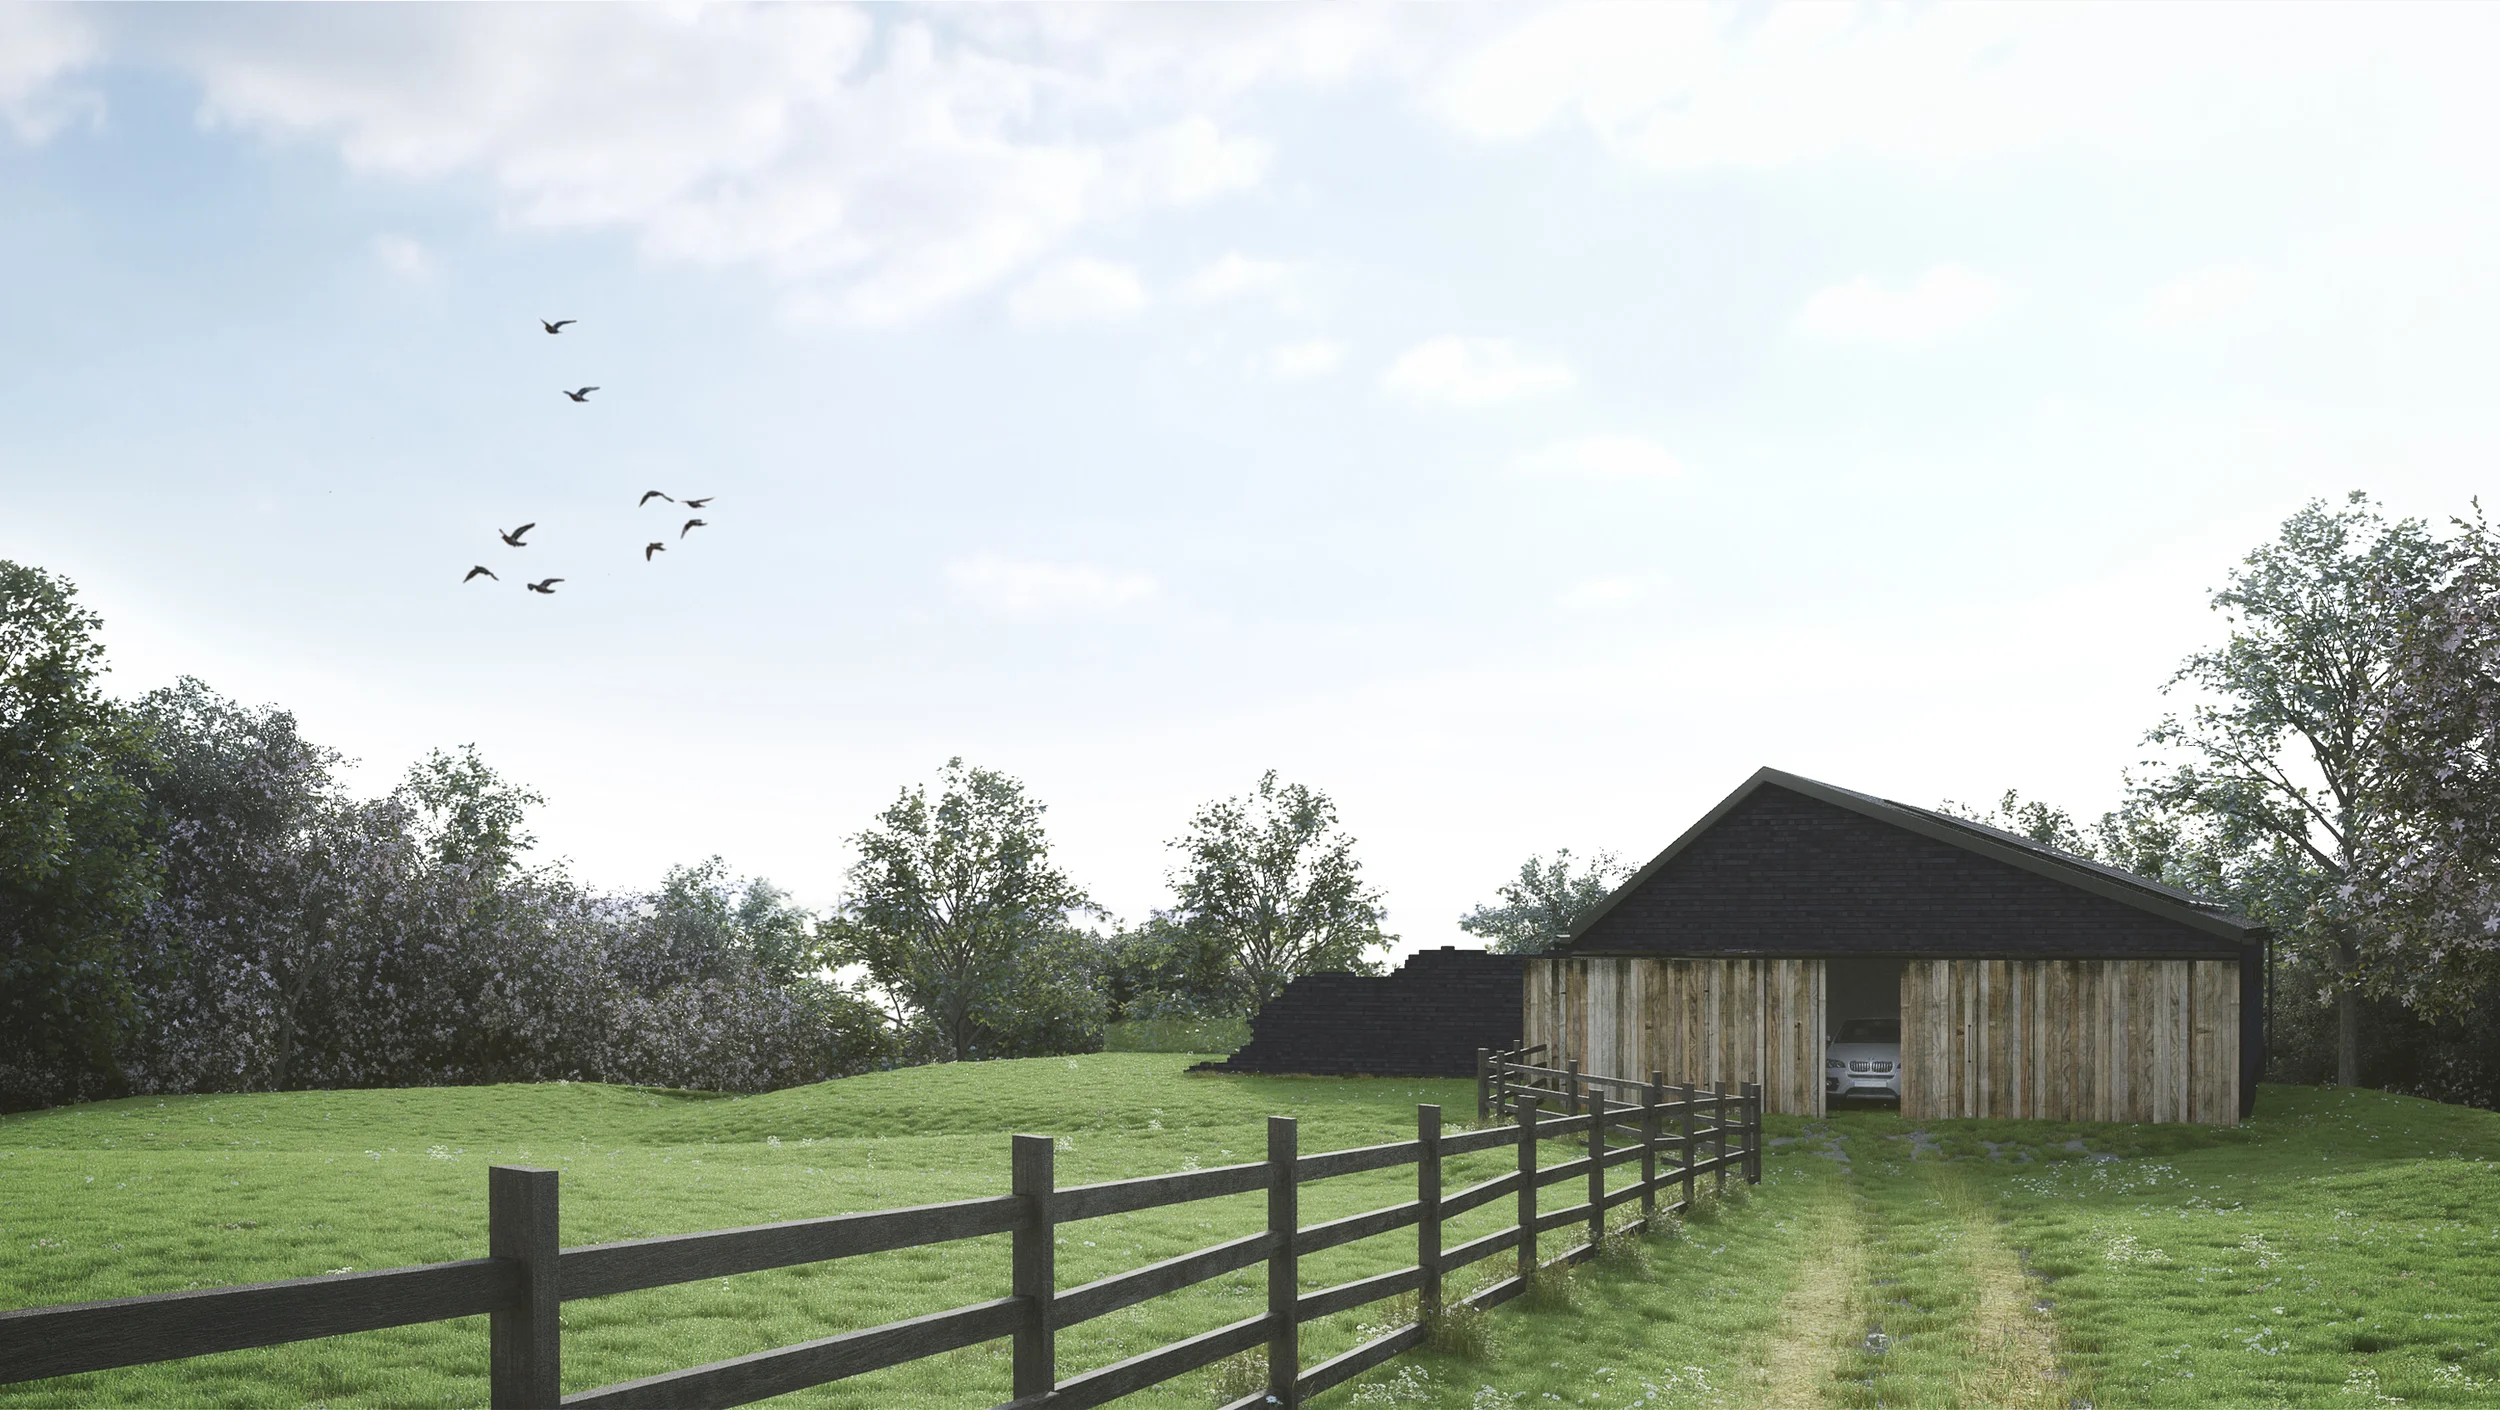
This project was for the award winning architectural practice Meloy Architects. The build is on a private plot of land on the edge of Fulking. A stunning four bedroom 'Passivhaus' with a fabulous Pavillion-style viewing floor. Completely at ease with the contours of the environment and maximising the enjoyment of the panoramic views over the surrounding National Park.
For designers to have their work understood it is often required to have 3D images produced. This gives clients visual aids rather than hoping they can imagine their new jet interior from CAD plans. If a client is not sold on the idea yet or hesitating to sign on the dotted line then 3D renderings are a good way seal the deal.
It has taken me way to long to get this tip out there but I here goes. Whenever I drag an image into Photoshop is doesn't allow me to edit it until I Rasterize the smart object. There is a way to 'Auto Rasterize' an image when it is dragged into photoshop so you don't have to do it each time. You can change this in Preferences and then you will no longer have to go through the pop up message, added up this could save some time.
"Then you better start swimmin' Or you'll sink like a stone
For the times they are a-changin'"
Bob Dylan - The Times They Are A-changin'
I love playing with the latest technologies and discovering future trends in the CGI industry. It is a fast moving field and you have to keep up if you want to be on top of your game. But it is easy to get carried away with the new 'super powers' these tools give you. With software getting easier to use more interior designers and architects are willing to try there hand at creating renders with good results. Is this bad news for the Visualisation Artist?
In a recent interview with the University of Creative Arts, I was asked my views on the future of the 3D Visualisation. This got me thinking about the future of the industry in terms of the artist and not the technology. I remember Lon Grohs of Choas Group saying at last years End User Event in Utrecht
"The last 10% is art, that matters, 90% is the tools"
I then started pondering the idea that we could be reaching a new era of art. Just like we did at the beginnings of the impressionism era. During this time we saw the invention and then the wide spread use of cameras. This made the need for highly realistic paintings less in demand, pushing artists to develop unique and creative styles rather than strive for realism. With talent and patience many extraordinary 3D artists are proving photorealism can be achieved. Meaning it is only a matter of time before more will follow in their footsteps. Once something has been proved possible many will then have the belief that it can be accomplished. In the same way the The Four-minute mile running barrier was broken, "It was first achieved in 1954 by Roger Bannister in 3:59.4. The "four-minute barrier" has since been broken by many male athletes, and is now the standard of all male professional middle distance runners."
Software is developing so rapidly that most interior designers and architects without much prior 3D knowledge will easily be able to turn their ideas into realistic renders. This could mark a turning point from photorealism to a more unique style like companies such as Mir and Luxigon have developed.

If we take Disney for example the have the skills to create highly realistic renders but in recent shorts such as Paperman and Feast they have opted to go for more stylised looks.

When cameras first arrived there were professionals with expensive equipment and a vast understanding of the equipment to take pictures. Then it become a lot more accessible for the majority of people to take pictures. But there was still room for professional, uniquely skilled cameramen and there still is today. So what does this mean for the professional cameramen of the virtual world? We need to develop unique styles, a photographer does more than aim and click a button and so should we. If you fear that anyone being able to create realistic 3D renders is going to be detrimental to your profession you are looking at it all wrong. Everyone being able to create 3D renders is going to push you to get better, create better images and as a whole will benefit you as a creative and the industry.
I bet you spend considerably less time now setting up lighting and modeling furniture than a few years ago. The time freed up will enable us to be more inventive in how we use our individual creative uniqueness.
Anything that enables us to work less like machines and enable us to think more creatively is a pro in my eyes.
The future is good and is looking better because technology is becoming easier to use. This opens up visualisation to a wider audience and rather than fearing software that enables more people to create high quality images we should be happy. This will mean less monotonous work for us and in turn our work will improve because we will have to develop our artistic uniqueness rather than our skills with the software.
Many Thanks to Tom Glimps @tomglimps and Simone Giampaolo @SGiampaolo for there help with this article.

A couple of pieces to report this month, firstly I went to EUE in Utrecht back in June, as usual it was great to catch up with the CG heads and learn lots of interesting things about 3D. Particular highlights were meeting Eric de Broche of Luxigon fame and Nils Norgrens from Neoscape's talk on leadership and starting a company. Write up coming soon. Whilst I was at EUE I bumped into Adam Hotovy who was kind enough to give me an early release of Corona A7. I took it for a spin with the new BMW i7. Corona is unbelievabley easy to use, get the conversion script from the forum and pretty much hit render and your good. I left it overnight and this is what I got, I did some minor color adjustments in Photoshop, but here that is now built in to the release version.

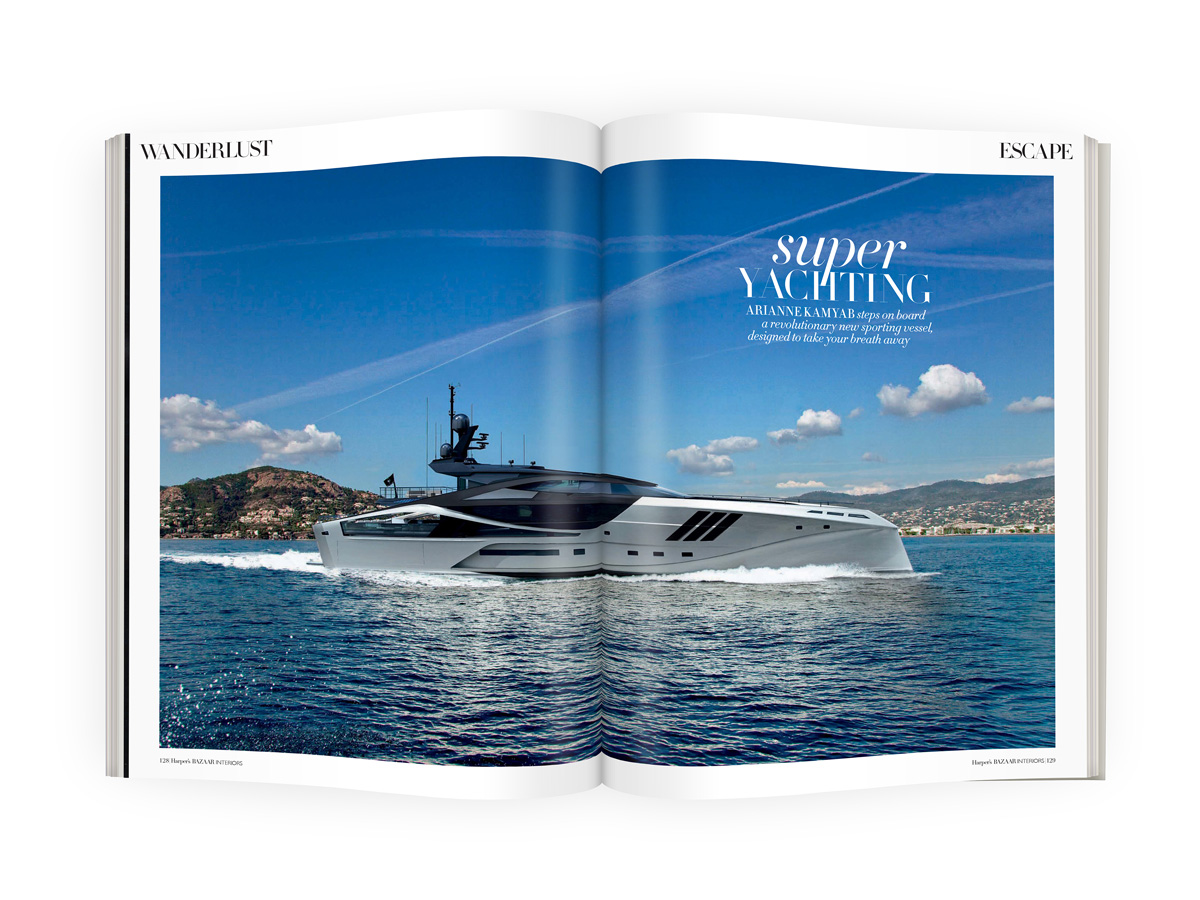
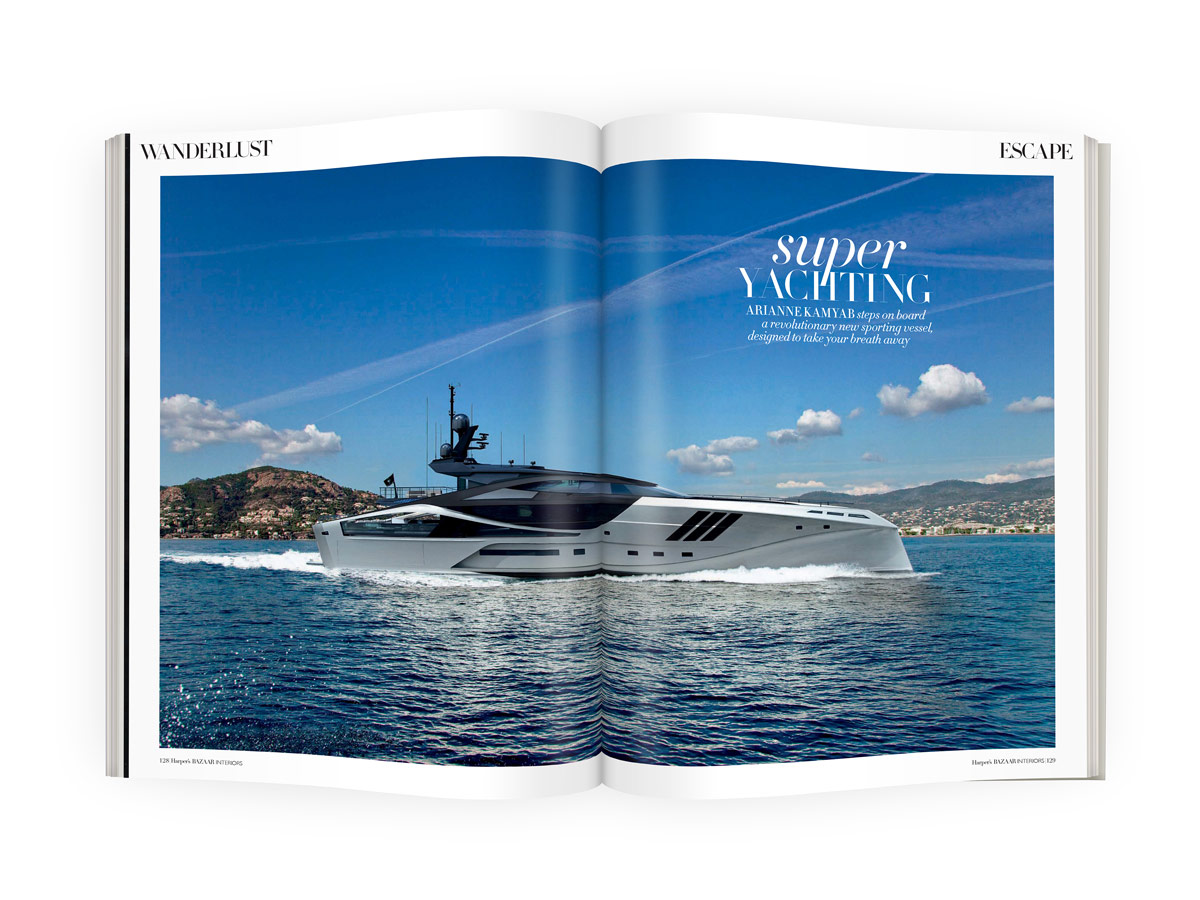
Harpers Bazaar also did a piece on the super yacht I have been working on recently. The images they used included a double page spread and some older interior images.


I am happy to introduce the interactive 3D Yacht App created for Palmer Johnson. Available on the Apple App Store and free to download to Ipad and Iphone devices.
The SuperSport series is so unique that in our minds it definitely warranted the production of an app to show what makes these new yachts so special. The application contains exclusive content and is the perfect way to enjoy the many features the SuperSport has to offer and understand the design and build philosophy behind the series.
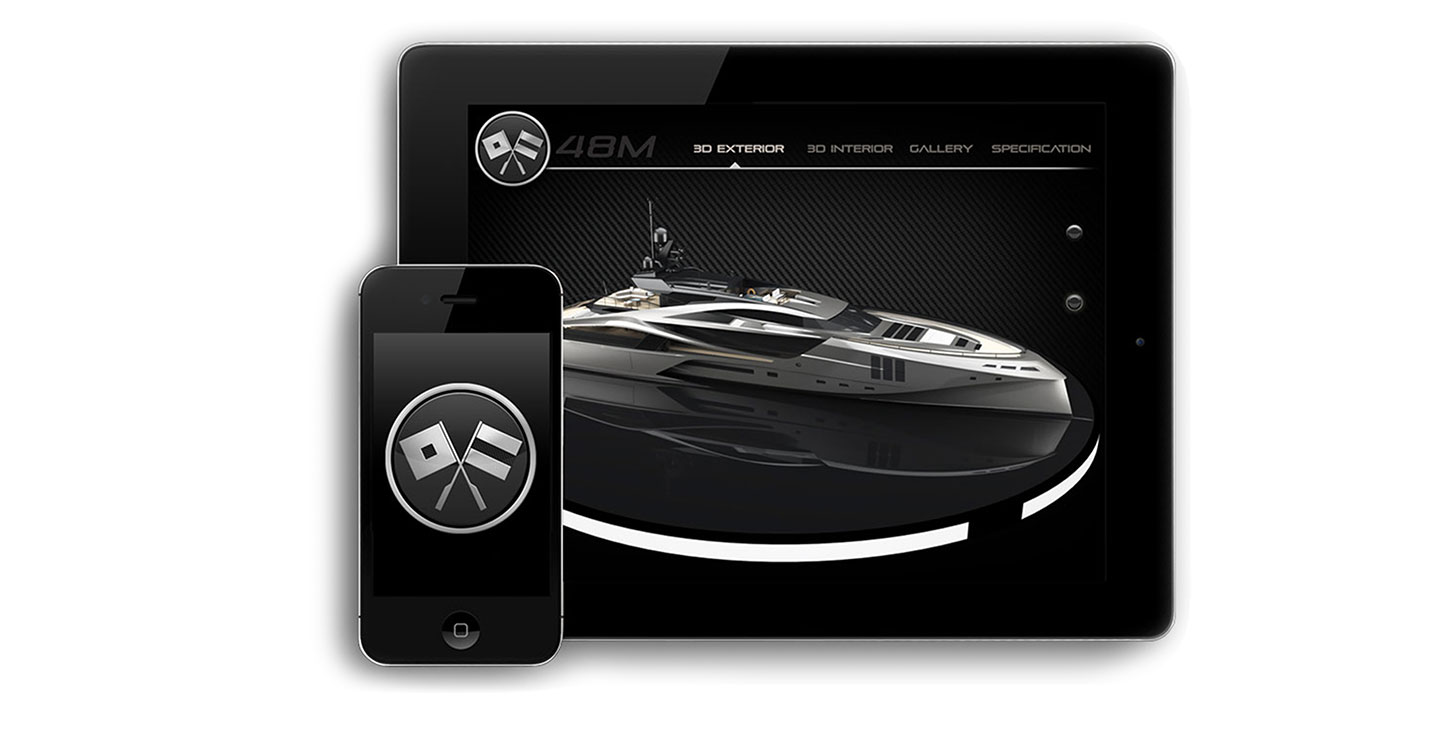


Next generation design and fresh experiential yachting lifestyle are experienced through the rotating exteriors and the 360 interior views.

The app includes handy marketing information. Ideal for brokers to present the yacht to their clients in a truly unique way, sure to produce maximum impact.

There is a gallery of images for each of these stunning carbon fibre yachts as well as layouts and brief specifications.

The App allows you to understand and view the fundamental principals that make this yacht series unique.

You can get the Interactive Palmer Johnson app on the Apple App Store. Download now

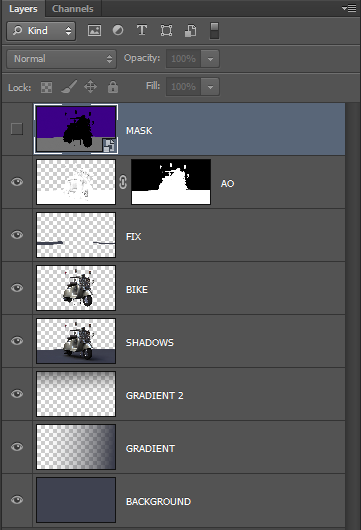
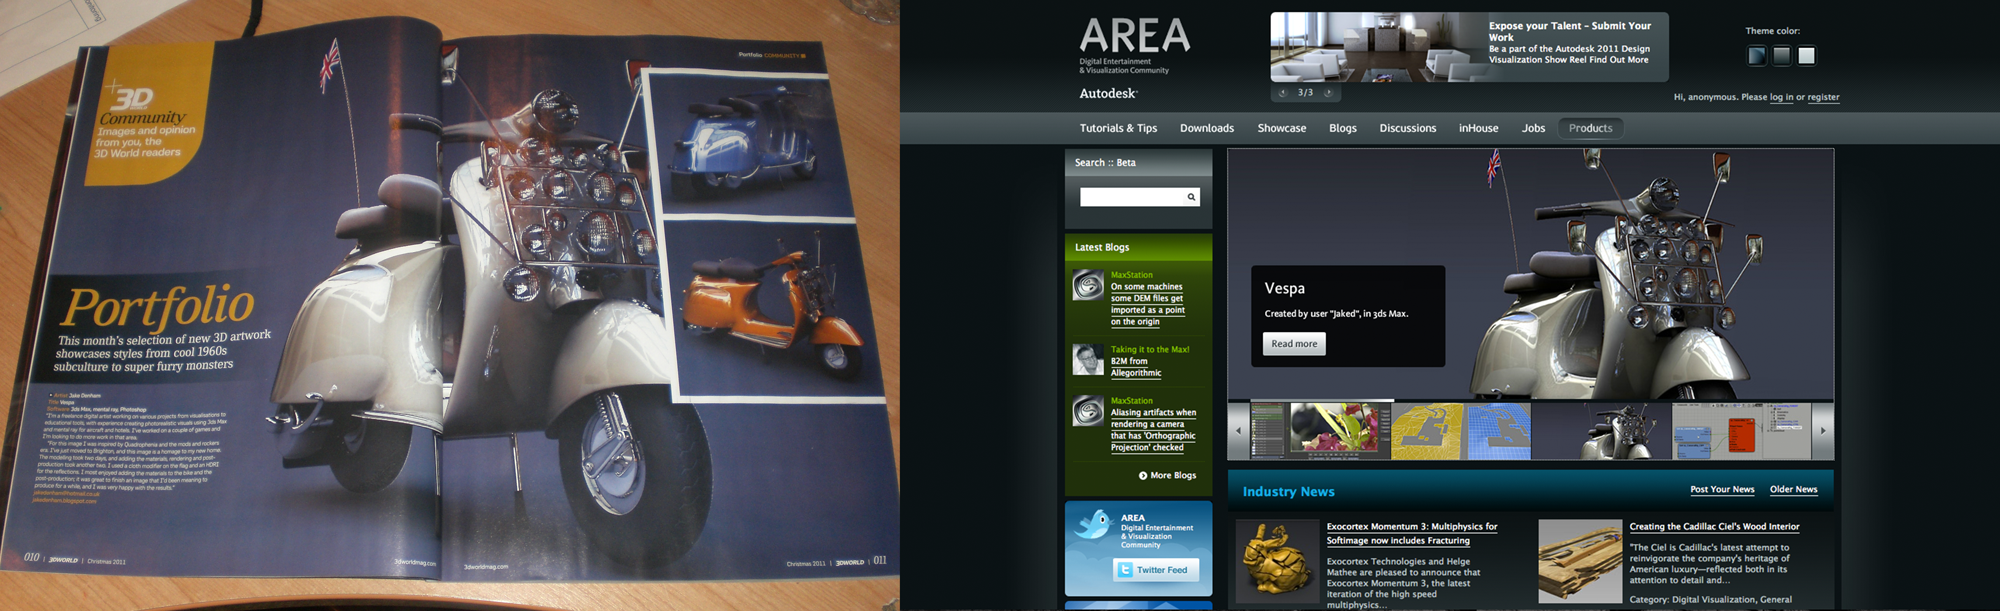
I originally created the Vespa model back in 2008 as part of a 'mods vs rockers' video game project based in 1960's Brighton. I was highly influenced by the 1979 film Quadrophenia. When I moved down to Brighton in 2011 I was inspired to revisit the project. The model I originally created was for a video game a few years previous so it was quite low poly. This time round I wanted to push the realism of the model. Before this project I had not used the Mental Ray render engine very much so it was good to take the opportunity to develop my knowledge of the engine. I wanted to push the engine and show you could create a good amount of realism with Mental Ray. There were a lot of 'firsts' for me in this project, the use of mental ray, a HDR image for lighting and the use of Ambient Occlusion.

.
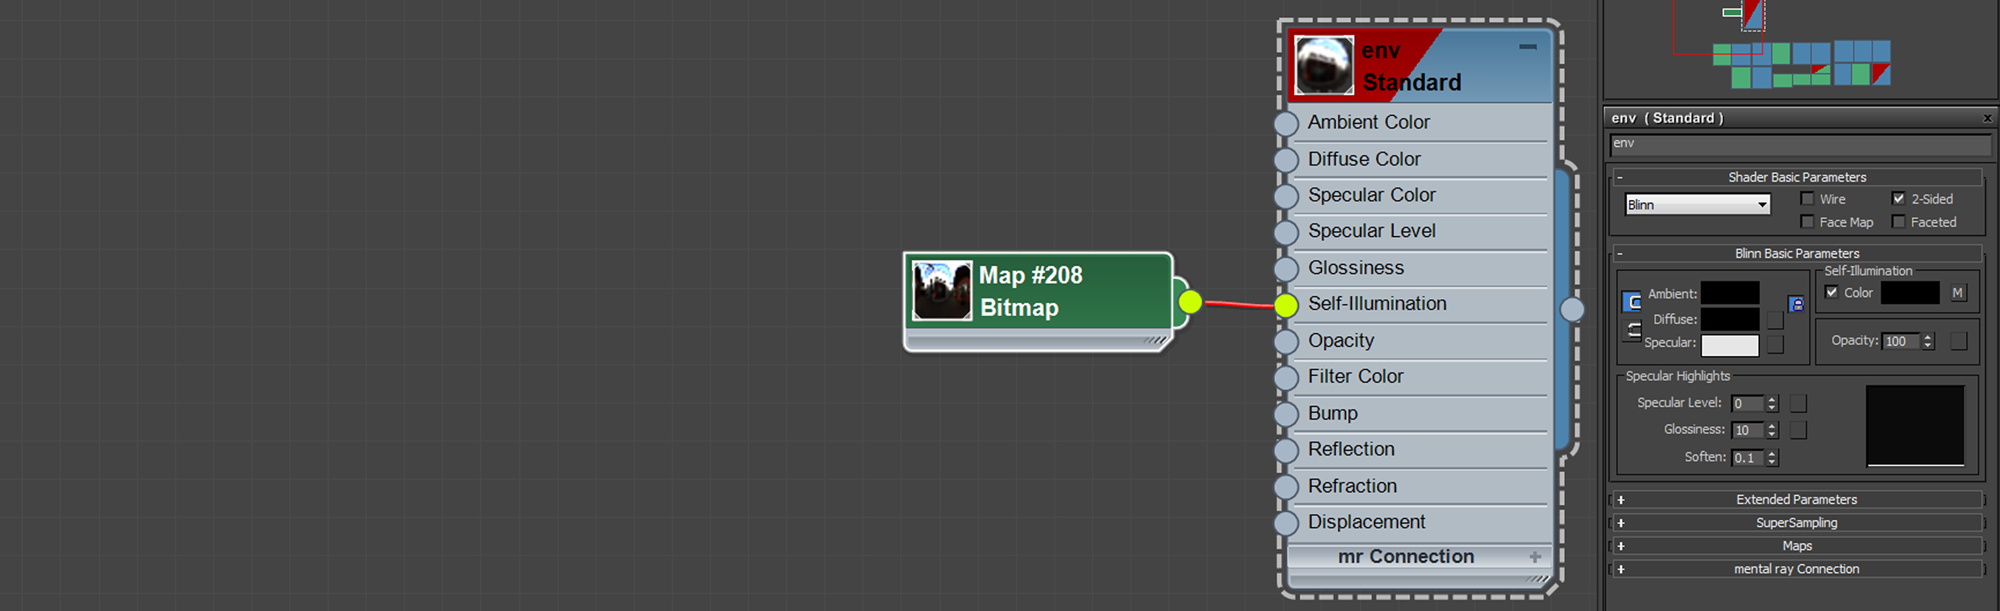


I put a ground plan down to get a shadow pass for the floor using a dark blue colour. I rendered an image without this plane and then render the floor using a region selection. I also created an ambient occlusion pass. More information on Ambient Occlusion How To: 3ds Max, Mental Ray and Photoshop.


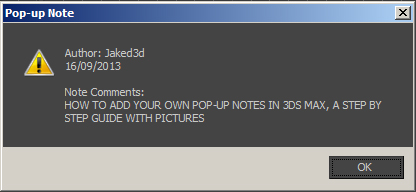
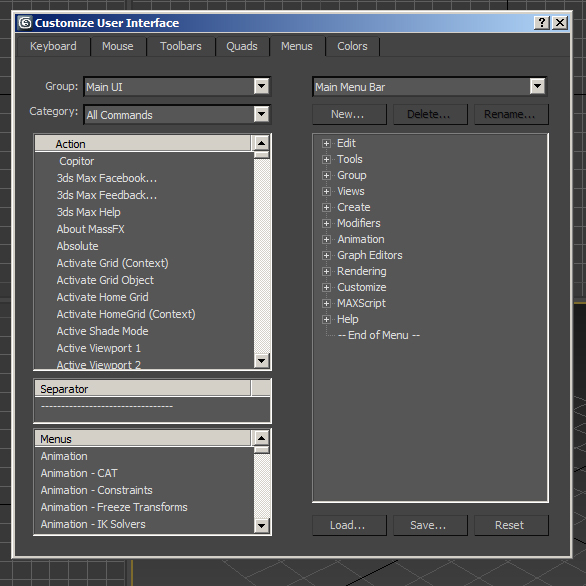
If you have downloaded one of the 3ds Max scenes from the downloads page you would have noticed a pop up note when you open it in 3ds Max. These can be useful for adding notes about the file for future reference or for a college who is going to use the scene or 3D model. To add pop up notes in 3ds Max is very simple just follow the steps below.
1. Right Click on the Main Toolbar in 3ds Max and select Customize from the drop down list.

2. Click on the Menu tab at the top of the new window.
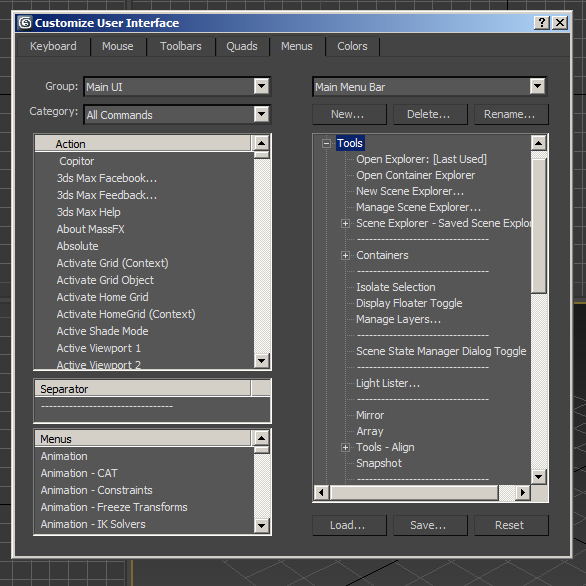
3. Now you can choose where you want to add the button to Add a Pop Up Note. I recommend Tools. So click the + next to the word Tools.
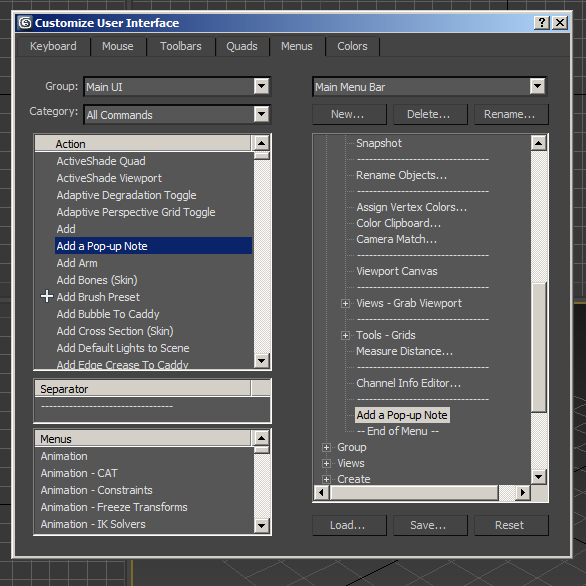
4. Now drag and drop a Separator bar across from the left side to the bottom of the new list.

5. In the Action list in the top left of the Customize User Interface window Drag and Drop Add a Pop up Note underneath the new Separator you just added.
6. Close the Customize window.

7. Now when you click on Tools in you should see Add a Pop up Note at the bottom of the list.

8. Click Add a Pop up Note.

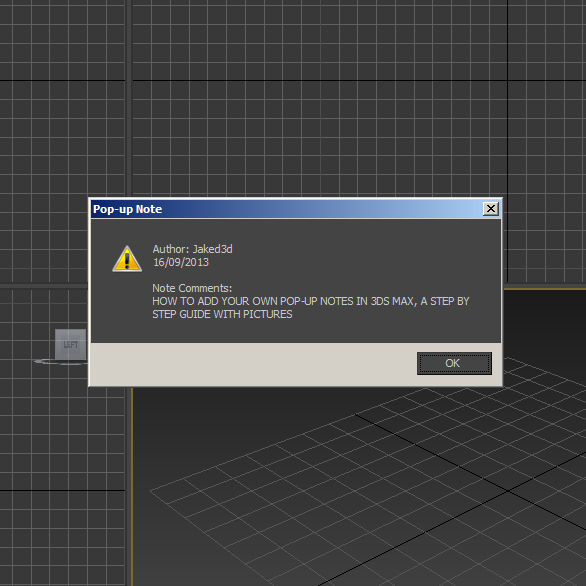
9. In the Pop Up Note window make sure that Show Note on File Open is checked. Here is also where you can add the Authors Name, Date and Description. Click Add Note.

10. Now save. Now when you open the file the Pop Up Note will appear.
And there you have it you can now add pop ups note in 3ds Max. If you found this post useful or informative please help me by commenting and sharing. Thank you.
 How To Record Actions in 3ds Max like in Photoshop
 Autodesk 3ds Max 2014 Service Pack 2
 Want to Know Why Autodesk 3ds Max is so Important for New York Production?
 Point Cloud Support in Upcoming 3ds Max 2014 Extension
 15 CGI Artworks That Look Like Photographs
 Autodesk Announces New Subscription 'Pay As You Go' Pricing on All Suites and Software
Hyperlapse photography is very similar to timelapse photography. To create both timelapse and hyperlapse photography you take still shots at regular intervals. Where it differs is time-lapse shows the passing of time from a fixed point. Where as with a Hyperlapse the camera is moving. These images are then combined in a movie editing software to create a video.
Here is a video tutorial on how to create hyperlapse photography. Griffin from the Indy Mogul, a DIY movie making channel, talks to film makers Chris and Oliver. They explain the techniques they use to capture shots with just a tripod and camera. This particular hyperlapse technique requires a lot of trial and error, but the outcome can be stunning.
For 3D Artists timelapse video is much easy to capture. In many 3D applications you can select a camera, click key frame and move your camera. Render out your frames. Then using a zdepth pass you can change the focus on your shots in adobe after effects or similar program.

The hyperlapse video is used regularly in 3D architectural visualisation. One of the best architectural visualisations to date is Alex Roman's The Third and The Seventh. Watch the full length video below in full screen. The Third and The Seventh Book will be arriving soon so keep an eye on http://www.thirdseventh-book.com/
The Third & The Seventh from Alex Roman on Vimeo.
Hyperlapses take a lot of time for a small amount of output. It has been compared to stop-motion meeting time-lapse photography. The results can be incredible for those who have the time and patience. Any other good hyperlapse or timelapse photography examples or tutorials drop them in the comments below.


I am extremely proud to say I am in this years Expose from Ballistic Publishing. I am very happy to be featured next to the best artists in the world. This year had over 8000 images submitted from 58 countries. My image the Red VW Camper can be seen in the Transport section of the book. You can see more of my publications here. The Red VW Camper is available for download over on Turbosquid.
http://www.youtube.com/watch?v=PVpWOGRGRFk
Here are the first few images of an Aston Martin rendered with Keyshot and Mental Ray . The first two images of the Aston Martin Vantage are rendered in 3ds Max with Mental Ray and a HDRI environment, later on in the post the Aston Martin is rendered with Keyshot. The feedback on the studio shots are that as the car is in a studio the reflections should be of lights and not of an environment.


Below is the next stage of the Aston Martin rendered with Keyshot. In this render I used Keyshot rather than Vray or Mental Ray and 3ds Max. It has proved to be a great learning experience, proving to me that Keyshot is an extremely quick and powerful tool. I also used HDR studio which I highly recommend. The next step for this project will be trying out Vray, 3ds Max and HDR Studio with higher resolution HDR images and backplates. As well as using the problems I encountered during this stage to improve the workflow in future. I hope to revisit this project when I can find time.

Here is a quick update image using Vray in a full 3D environment. That is three render engines and counting! :)


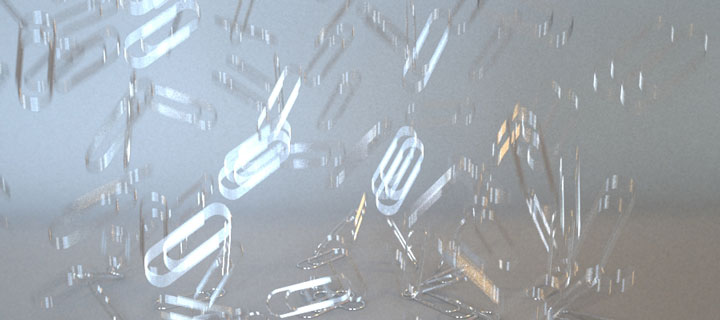
I am happy to present a some new renders from a Vray Physical Camera study. In this study I wanted to looking deeper into the Vray Camera focus and motion blur settings. The table and chairs scene was very basic using three Vray Lights.
 For the paper clips I used a studio with a HDRI and Rayfire to animate.


I always had a problem when painting with a hard brush in Photoshop. I found that the default would leave spaces. I never looked into fixing this until today, I used to go over the same area a few times. Not very productive I know.

In Photoshop open the Brush Tab by selecting Window - Brush or pressing F5. In there with the Hard Brush selected change the spacing to 1% rather than 25%. And there you are, a nice smooth brush.
To save the new brush hit New Brush Preset and OK.
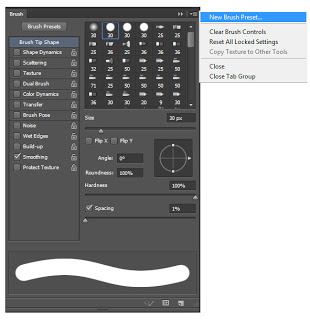
Then hit Brush Preset (top left of the pop-out) Preset Manage and move the new brush to where you want.
Then you can save the new set.


I was looking for a way to repeat some of the most common tasks I perform in 3ds max. It turns out that using MAXScript is the way to do it. Don't let the word 'script' scare you, it is pretty easy. The task I wanted to create an 'action' button for was. -Apply UVW Map -with Box Mapping and Real-World Scale
To create the Script we need an object to record the action from. So just create a box.
Click on MAXScript (next to Help) on the top menu. Select MAX Script Listener
This Box will pop up, Click MacroRecorder and Enable from the dropdown.
 Now what ever you do will be recorded, like in Photoshop actions.
Apply a UVW Map > Mapping to Box > tick Real-World Map Size Turn off the MacroRecorder by hitting enable again.
This is what you have. modPanel.addModToSelection (Uvwmap ()) ui:on $.modifiers[#UVW_Map].maptype = 4 $.modifiers[#UVW_Map].realWorldMapSize = on $.modifiers[#UVW_Map].utile = 1 $.modifiers[#UVW_Map].vtile = 1 $.modifiers[#UVW_Map].length = 1 $.modifiers[#UVW_Map].width = 1 $.modifiers[#UVW_Map].height = 1 Select all the text and copy it.
At the top of Max go to MAXScript again and New Script. Paste in the code.
At the top copy and paste this... macroScript UVWmap category:"Jaked3d" buttonText:"UVWmapRWS"
You can change the name of the Script (UVWmap) category:"(Jaked3d)" and buttonText:"(UVWmapRWS)"
Add brackets to the top and bottom of the code like below

Now in MAXScript > File > Save where you like In MAXScript > Tools > Evaluate All
Now in the top menu in 3ds Max Select Customize > Customize User Interface In the Toolbars tab in Category you should find what you called your category you can now drag it 'Uvwmap' onto the Main Toolbar.

You can now select any object in your scene and apply your script. You can download this one here. Jaked3d UVWmapRWS
You can then combine your 'actions' with other scripts. For example I recorded the same action in the above example with the Centre and Reset script from Frodos Magic Bag to centre the pivot of an object > reset xform > apply uvw map with box mapping and real world scale, in one hit of a button.
Search Macro Scripts in 3ds Max Help for lots more info.


